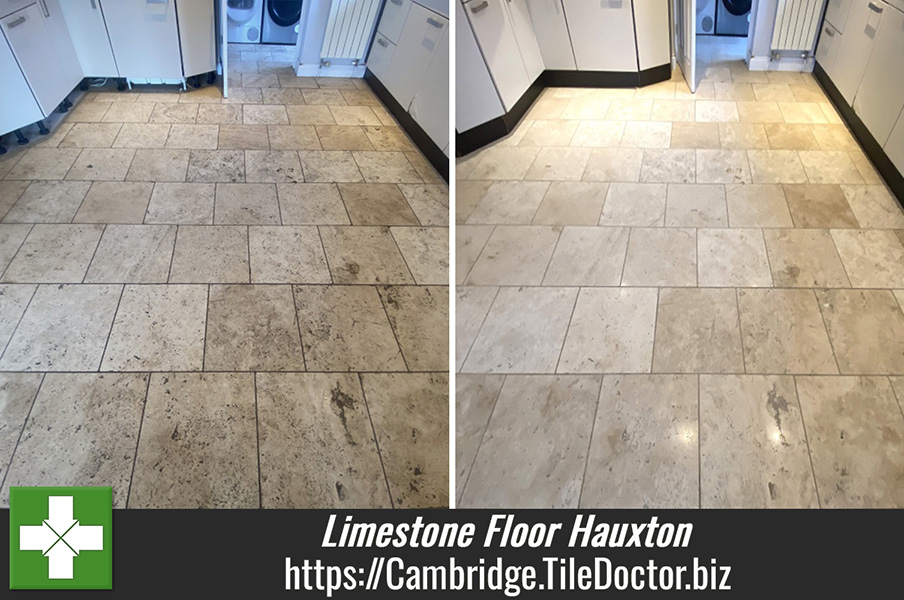
Dirty Limestone Tiled Floor Deep Cleaned and Sealing in Hauxton
These photographs are from a Limestone tiled floor in the Kitchen of a property in the village of Hauxton south of Cambridge. The client was fed up with it constantly looking dirty and decided something must be done.

This is a common problem with Stone floors, being a natural material dirt becomes ingrained in the pores and once trapped in there it becomes very difficult to shift. The answer is to seal the stone with a sealer which keeps the dirt on the surface where it can be easily cleaned away. However, sealers do wear down with use and eventually fail allowing dirt into the stone again.
Having explained this I quoted to deep clean the floor and then seal with an impregnating sealer that will add long lasting protection to the stone. I also offered to burnish the Limestone to add a polish however the decided to not to take me up on this option.
Deep Cleaning Limestone Floor Tile and Grout
To deep clean the floor, I applied a medium dilution of Tile Doctor Remove & Go and left it to soak in for ten minutes. This product as its name suggests is a coatings remover and although the sealer had worn off it was still present in some of the less used parts of the floor. In order to get a consistent finish, it’s important to remove all of the sealer from the entire floor.
Remove & Go is also a good tile and grout cleaner and after scrubbing the tile with a rotary machine fitted with a black scrubbing pad it did a good job of pulling the dirt out of the stone to the surface. The pads can struggle to reach into the recesses of the grout lines, so these were cleaned by hand using a stiff brush and more Remove & Go.
After cleaning the soiling was extracted using a machine that’s built into the van. This machine deploys water at high pressure onto the floor and then simultaneously extracts the soiling with a powerful vacuum into a waste tank leaving the floor fairly dry. It’s a great tool that helps to speed up the cleaning process.
Last step in the cleaning process was to run a 1500-grit burnishing pad across the floor to remove water marks. I use a 17-inch pad fitted to the rotary buffer running it over each tile several times. The pad is used with water for lubrication and then the floor is cleaned again using the van mounted machine.
Sealing Limestone Floor Tiles
The floor was left to dry off overnight and I returned the next day to apply the sealer for which we selected Tile Doctor Ultra-Seal. This is a natural look sealer that soaks into stone occupying the pores and thereby preventing dirt from residing there. This product was chosen as it offers invisible protection and won’t alter the natural look of the Limestone.
Once dry the Limestone floor was given a final buff using a red pad to remove excess sealer buff up the appearance of the stone which now looked so much cleaner and brighter than before. My client was very happy with the improvement and asked me to return and apply the same process to several bathrooms floors at the property which had the same tile.

For aftercare cleaning I recommended they use Tile Doctor Neutral Tile Cleaner which is a mild yet effective floor tile cleaner that won’t impact the sealer which can be the issue with stronger products.
Professional Limestone Floor Tile Cleaning in Hauxton
Dirty Limestone Tiled Floor Deep Cleaned and Sealing in Hauxton Read More »