St. Neots Tile Cleaning

St. Neots Tile Cleaning

Welcome to my Work History archive where you will find examples of the cleaning and renovation of tiles carried out in St. Neots.

Mosaic Swimming Pool Tiles Before After Grout Haze Removal Sandy

Removing Grout from new Mosaic Swimming Pool Tiles

A tiling company were in touch last month with an urgent request to assist on a project that had just completed tiling a swimming pool at a house in Sandy which is just south of St Neots. The company had done a lovely job of tiling the pool with 60m2 of blue mosaic ceramic tiles however were having issues removing the grout that was smeared on the tiles.

Swimming Pool Before Grout Haze Removal Sandy Cambridgeshire
Grout has come on a long way in the last ten years and manufactures are producing some very durable products using modern ingredients such as a resin cement which has high water repellence characteristics. It was a product like this that had been used to grout the swimming pool however given the warm weather and the large tiling area involved it had dried quickly and set hard on the surface.

The tiling company was now struggling to remove the grout haze and naturally concerned the owner would not be impressed with the result quickly got in touch looking for a solution. We deal with these issues all the time so given the area involved and a photo of the pool I was able to provide a quote over email which was accepted, and I was booked in.

Removing Grout Haze from Mosaic Swimming Pool Tiles

My solution was to apply a product called Tile Doctor Grout Clean-up which pretty much does what its name suggests. It contains concentrated phosphoric acid and a cleaning agent, a formula specifically designed to remove light grout smears (grout haze) but also effective on removing mineral deposits such as efflorescence, rust staining and hard water marks.

Working in sections the Grout Clean-up was diluted with water and sprayed onto the tile. It was left for a couple of minutes to soak into the grout smears and then worked in with a black scrubbing pad. I was able to use a floor machine for this at the bottom of the pool and smaller pads fitted to a hand buffer on the wall tiling. After agitation, the area was rinsed with water and the soil removed using our vehicle mounted extraction machine which is very effective.

Swimming Pool After Grout Haze Removal Sandy Cambridgeshire
The job took about ½ a day to complete and as you can image the tiling company was quite relieved, I had managed to resolve the problem, they even left the following feedback for me:

Left a lovely job, very happy with the finish, would definitely recommend.
 

Professional Removal of Grout Smears from Mosaic Swimming Pool Tiling

Removing Grout from new Mosaic Swimming Pool Tiles Read More »

Travertine Tiled Patio Floor Restoration in Stonely

Renovating a Large Travertine Patio in Stonely

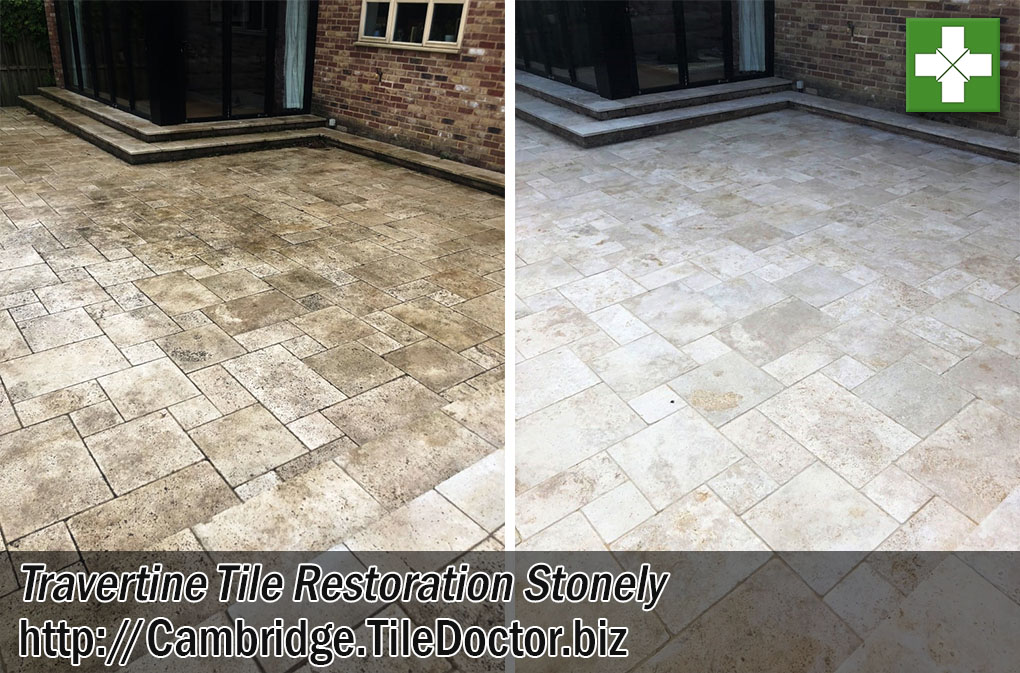
Earlier in the year I paid a visit to a property in the small and sleepy hamlet of Stonely on the outskirts of St Neots to survey a large Travertine patio which needed renovating. As you can see from the photos the patio was looking tired and needed some work.

Travertine Patio Before Cleaning Stonely

After an inspection I could see that the stone patio had three main problems:

  • First it needed a deep clean to remove a build-up of dirt and algae making them slippery.
  • Second there was areas of loose grout which had become dislodge over time and now needed raking out replacing.
  • Third some of the Travertine tiles had become loose over the years and needed lifting, cleaning up and relaying.

We always try and do a site visit where possible as photos don’t always give us the true picture and we always want to give the client an accurate quote as possible. The client was happy to go ahead with the remedial work and keen to have the Patio in full working order so they could make use of the space whilst the weather was good.

Travertine Patio Before Cleaning Stonely

Deep Cleaning and Repairing a Travertine Patio

My first task was to give the patio a deep clean using a strong dilution of Tile Doctor Remove and Go which was left to soak into the patio. After ten minutes it was scrubbed in with a medium 1500-grit burnishing pad fitted to a rotary machine. This action lifted the ingrained dirt out of the stone and cleaned up the surface.

Tile Doctor Remove and Go is a multi-purpose coatings remover formulated to remove old sealers and other coverings. This product also draws out ingrained stains and can remove heavy grease build-up, so it was perfect for this job. I then used a truck mounted hot water extraction machine to remove the dirt and slurry which is extracted to grey water tank on the van. It was a large patio, so the cleaning process took up most of day one.

I came back the following day to carry out the necessary repairs which consisted of filling in holes, cracks and raking out and replacing loose grout. In addition, one whole length of tiles on the step had to be removed, cleaned then relayed as all of them had become loose over the years. Once all repairs where complete I arranged to return the following day to complete the renovation with the application of a sealer.

Sealing a Travertine Patio

I returned on day three to seal the entire Travertine Patio, fortunately we had picked a good week to do the work and the weather remained dry. For the sealer I chose Tile Doctor Colour Grow which is an impregnating sealer that is externally rated and should cope well with the UK weather. This gave the patio a lovely finish and will give the stone protection from staining and make it much easier to keep clean, in fact a rinse with a hose should do the job.

Travertine Patio After Cleaning Stonely

The client was very happy with the outcome and is now able to finally get the garden furniture out and start using the outside space without fear of slipping or tripping on the loose stone. I was even asked to come back again to clean and seal another stone patio at the rear of the garden, which I will now doubt follow up later with a separate article.

The client left the following Five Star feedback, for which we are always very grateful as so much of our work comes from recommendations.

“A very professional attitude, and a job well done and on time”

Travertine Patio After Cleaning Stonely

Professional Travertine Patio Maintenance in Cambridgeshire

Renovating a Large Travertine Patio in Stonely Read More »

Victorian Floor Before During After Restoration St Neots

Victorian Tiled Hallway Repaired after Pipe Installation in St Neots

Earlier this year I was asked to quote for repairing and restoring a Victorian Tile Hallway in St Neots. The floor was in good physical condition for its age however a section of tiling had been removed to facilitate the installation of a new pipe. The contractor was not very sympathetic to the old floor and after removing the tiles and installing the pipe they had simply back filled with concrete ruining the overall look of the floor.

Victorian Tiled Hallway Before Repair Restoration in St Neots

The rest of the Victorian Tiled Hallway had not been properly cleaned and sealed in some time and any protective sealer had long since worn off in the busier parts of the hallway. Without a sealer in place dirt had penetrated the pores of the tile leaving them looking dull and impossible to keep clean.

Victorian Tiled Hallway Before Restoration in St Neots Victorian Tiled Hallway Before Restoration in St Neots

Period features like this floor are very desirable these days and understandably the owner was every enthusiastic to have the floor fully restored back to its best possible condition.
I discussed with him the work we needed to do, which included repairing the concreted sections, deep cleaning the floor and then finish with the application of a protective sealer. I was confident I could source similar tiles and would be able to get the floor looking great again. We agreed a price and booked the work in to be carried out.

Victorian Tiled Hallway Before Restoration in St Neots

Repairing a Victorian Tiled Hallway Floor

I started by manually removing all the concrete at the back of the hall with a bolster and hammer. Once cleaned of rubble the hole was filled with a self-levelling compound to even out the area in order to get the surface to the right level ready for tiling.

Victorian Tiled Hallway During Restoration in St Neots

Fortunately, I had managed to source nearly identical tiles to replace the missing ones. There are a few places that keep stock, so it makes it easier to restore this type of floor.
The border was laid first followed by filling in the middle with the correct pattern.

Victorian Tiled Hallway During Restoration in St Neots

Deep Cleaning a Victorian Tiled Hallway Floor

Once grouted the whole floor was stripped and cleaned using Tile Doctor Remove and Go which is a coatings remover that is designed to clean and remove old sealers from tile and stone. The product is diluted with water, sprayed onto the tiles and then allowed to soak in for ten minutes before scrubbing it in. The solution soon turns into a dark slurry as the dirt is released from the pores of the tile and this is then rinsed off with water and extracted with a wet vacuum.

Victorian Tiled Hallway During Restoration in St Neots

The next step was to treat any potential efflorescence problems that may appear later due to the lack of a damp-proof membrane under the floor. This is quite a common issue with old floors where moisture can rise through the tile carrying with it salts from the sub floor. To counter this problem and neutralise the alkaline salts the floor is further cleaned with Tile Doctor Grout Clean-up which is an acidic product. To remove the product another round of rinsing and extracted is carried out.

During the cleaning I noticed that some of the tiles had damage to the surface from being concreted over, so I renovated the surface using a 200-grit burnishing pad that hones the tile. Once I was happy the floor was clean, I left it to dry off for two days.

Sealing a Victorian Tiled Hallway Floor

I came back to seal the floor first checking with a damp meter that the moisture levels in the tile were below an acceptable level. All was well so I started the application of the sealer with a base coat of Tile Doctor Colour Grow which is an impregnating sealer that will deepen the colours and add an extra layer of protection.

Once the first dry coat of Colour Grow was dry, I followed up with five coats of Tile Doctor Seal and Go which adds further layers of protection and leaves the tiles with a nice subtle sheen.

Victorian Tiled Hallway After Restoration in St Neots

The job took five days in total, three days to sympathetically repair the floor followed by two days to clean and seal. You can see from the pictures that the repaired area looked very original and overall the floor looked great and the pattern is stunning. For aftercare I recommended they kept the floor clean using Tiles Doctor Neutral Tile Cleaner, this will keep the floor clean and ensure the sealant isn’t eroded prematurely which can happen with stronger floor cleaning products.

Victorian Tiled Hallway After Restoration in St Neots Victorian Tiled Hallway After Restoration in St Neots

The customer over the moon with the results and left the following glowing testimonial for me on the Tile Doctor feedback system.

”Tom was professional, meticulous, polite and hard working. We would have no qualms about recommending his service to others – especially with mosaic Victorian flooring like ours. Good value and plenty of expert advice and guidance thrown in for free. Thanks Tom. By Alden W, St Neots”

Victorian Tiled Hallway After During Restoration in St Neots


Professional Restoration of a Victorian Tiled Hallway in Cambridgeshire

Victorian Tiled Hallway Repaired after Pipe Installation in St Neots Read More »

Salt Stained Quarry Tiles Floor Before After Renovation Gamlingay

Restoring a Salt Satined Quarry Tiled Floor in Gamlingay

This quarry tiled floor in the village of Gamlingay had been subject to efflorescence salt staining over many years. This problem typically occurs in older houses where the floor has been laid without a damp-proof membrane allowing moisture to rise through the tile bringing with it salts from the sub floor. Gamlingay is located in South Cambridgeshire, near the border with Bedfordshire, is an ancient village which features in the Domesday Book. Not surprisingly a lot of the property here is quite old and includes sixty listed buildings.

Salt Stained Quarry Tiled Hallway Floor Before Cleaning Salt Stained Quarry Tiled Hallway Floor Before Cleaning

Before the current owner moved in the property had been left dormant and empty with no heating which hadn’t helped the condition of the floor amongst other things. The white efflorescent salt staining was now very evident on the Quarry tiles and had caused a lot of damage to the surface of the floor. I discussed with the client how we could help and carried out a test clean. They were happy with the result and we agreed our quote to renovate the floor. We arranged to return later in the month.

Renovating a Salt Damaged Quarry Tiled Hallway Floor

The cleaning began with the application of Tile Doctor Remove and Go which was sprayed onto the tile and left to soak in for about ten minutes. The tiles were then scrubbed with a very coarse 200-grit diamond pad fitted to a rotary machine. The soil was then extracted using our van mounted hot water extraction system which makes light work of rinsing the floor and keeps the mess to a minimum. The combination of Tile Doctor Remove and Go and the coarse pad cleaned and resurfaced the tile improving the appearance of the floor and once the soil was removed you could really see the transformation.

We finished the cleaning process by giving the whole floor an acid wash using Tile Doctor Acid Gel. The acid dissolves the alkaline salt still present in the floor and removes any grout haze still present on the tile. Once this had been scrubbed in it was rinse off and extracted using the hot water extraction system as before. The floor was then left to dry out which due to the lack of damp-proof membrane was expected to lake longer than usual, so we decided to leave the floor a few days.

Sealing an Old Quarry Tiled Hallway Floor

We returned on a nice sunny day and first tested the floor with our damp-proof meter. This just tests the moisture levels in the floor to check they are to an acceptable level. If the floor is not dry the seal will not cure properly, and the process would be a waste. In this case the readings were fine, and I was happy the floor was dry enough to be sealed.

The client had requested the floor have a low sheen appearance and they didn’t want it to look too shiny. Given the floors history with Efflorescence however I needed to choose a sealer that would give the desired appearance but was also breathable to allow for moisture to rise through the tile. Trapping moisture under the tile with a non-breathable sealer can result in moisture spreading to the walls leading to rising damp.

On this occasion I opted to go with the application of Seal and Go extra which is breathable and leaves a subtle sheen appearance. The acid wash we gave the tiles should neutralise the alkaline salts and now the house was occupied the damp issues which had led to them occurring in the first place are less likely. I applied six coats of sealer, allowing each one to dry before applying the next.

Salt Stained Quarry Tiled Hallway Floor After Cleaning Salt Stained Quarry Tiled Hallway Floor After Cleaning

As you can see from the pictures, the work made a dramatic difference to the floor and my client was delighted with the transformation.

Salt Stained Quarry Tiled Hallway Floor After Cleaning
 

Professional Restoration of a Quarry Tiled Hallway in Cambridgeshire

Restoring a Salt Satined Quarry Tiled Floor in Gamlingay Read More »

Marble Tiled Kitchen Before and After Cleaning in St Neots

Dirty and Stained Marble Kitchen Tiles Rejuvenated in St Neots

St Neots is the largest town in Cambridgeshire, with a population of approximately 40,000 (Cambridge is after all a city). This is unsurprising, since the town has a long and rich history. In fact, archaeological evidence indicates that the area was home to settlements as early as the prehistoric Mesolithic period.

I was recently called out to a property in the area – which itself was relatively old – to see what could be done to restore the condition and appearance of a Marble tiled kitchen floor, stylised in a small and uniform square pattern. It appeared to me that the tiles had been installed for a long time – perhaps even laid down in the original construction of the property – and, in any case, had suffered many years’ worth of neglect.

The result? A very dirty and unappealing appearance and a very unhappy owner.

Marble Tiled Kitchen Floor Before Cleaning St Neots Marble Tiled Kitchen Floor Before Cleaning St Neots

Cleaning a Dirty Marble Tiled Kitchen Floor

Before beginning the restoration of the floor, I covered up the walls and kitchen units to protect from exposure to any of the cleaning products I would be using. I then started by cleaning the floor with Tile Doctor Remove and Go, which is a multi-purpose product. Remove and Go both cleans the stone and strips away any old sealer.

However, there were several areas of the floor which were affected by more deeply ingrained dirt and stains. To remove these, I needed to use a process which we call burnishing. This involves the application of diamond encrusted burnishing pads to grind away the damage layer of stone. I then used a truck-mounted pressure washing system to rinse the floor and remove all the excess slurry and chemicals.

Sealing a Marble Tiled Kitchen Floor

While burnishing can be used to achieve a high quality polished finish on stone such as Marble, Limestone and Travertine, the customer decided instead to have a more natural look for the floor.

Therefore, to seal the freshly cleaned Marble tiles, I applied two coats of Tile Doctor Colour Grow, which is an impregnating sealer that offers maximum protection and a matte finish that matches nicely with the rustic characteristics of the floor. As an impregnating sealer, Colour Grow penetrate deep into the pores of the stone to fill them and prevent dirt from becoming ingrained in the future.

Marble Tiled Kitchen Floor After Cleaning St Neots Marble Tiled Kitchen Floor After Cleaning St Neots

The customer was amazed by the difference made to the condition and appearance of the floor, so much so that he has queried about getting more areas of the property cleaned in the future. Another satisfied customer.

Professional Tile Cleaning and Sealing for a Dirty and Stained Marble Kitchen Tiled Floor Restoration in St Neots

Dirty and Stained Marble Kitchen Tiles Rejuvenated in St Neots Read More »

Cleaning micro porous Porcelain tiles in Gamlingay

Cleaning micro porous Porcelain tiles in Gamlingay

Most Porcelain tiles are non-porous making them an ideal floor covering especially in high traffic areas, the porcelain tiles fitted at this house in Gamlingay however featured small pits in the surface and over the years the pits had become engrained with dirt which proved difficult to clean. The porcelain tiles had been fitted throughout the ground floor and this was a reasonable sized house so it was going to take some time to clean.

Porcelain Tile Cleaning Gamlingay Before Porcelain Tile Cleaning Gamlingay Before

Cleaning Micro Porous Porcelain Tiles

To speed the job up we use a lot of machinery which can cause splashing so the first job was to protect all the walls with plastic sheeting and in the kitchen we removed the kick boards.

Working in sections the floor was wetted with a dilution of Tile Doctor Pro-Clean which was left to soak into the tile for twenty minutes to help break down the dirt before it was agitated and worked into the tile using a rotary machine fitted with a scrubbing pad.

Porcelain Tile Cleaning Gamlingay During Porcelain Tile Cleaning Gamlingay During

The combination of Pro-Clean and scrubbing action loosened the ingrained dirt leaving a dirty cleaning solution; scrubbing pads can struggle to reach the grout so this was scrubbed by hand using a stiff brush. Stubborn areas were re-treated and once we were happy with that section of floor it was pressure cleaned using a special spinner tool which applies clean under pressure as well as simultaneously extracting liquids from the surface. This tool has the added advantage of neutralising the floor ensuring no trace of chemical is left behind that could upset a sealer. Cleaning took much of the day so by the time we finished it was getting quite late so we left allowing the floor to dry off overnight.

Sealing Micro Porous Porcelain Tiles

We came back the next day to seal the floor and after checking the tiles had indeed dried we proceeded to apply Tile Doctor Ultra Seal which is an impregnating sealer designed to fill up the pores in the tile so contaminates cannot get it in, the other advantage of this particular sealer is it does not change the look of the tile.

Porcelain Tile Cleaning Gamlingay After Porcelain Tile Cleaning Gamlingay After


Porcelain Tile Cleaning in South Cambridge

Cleaning micro porous Porcelain tiles in Gamlingay Read More »

=================================

Cambridge Tile Doctor

================================= Read More »

Scroll to Top