tile cleaning

Limestone Floor Polished in Fordham Cambridge

Honing Limestone Flooring Before House Sale in Fordham Village

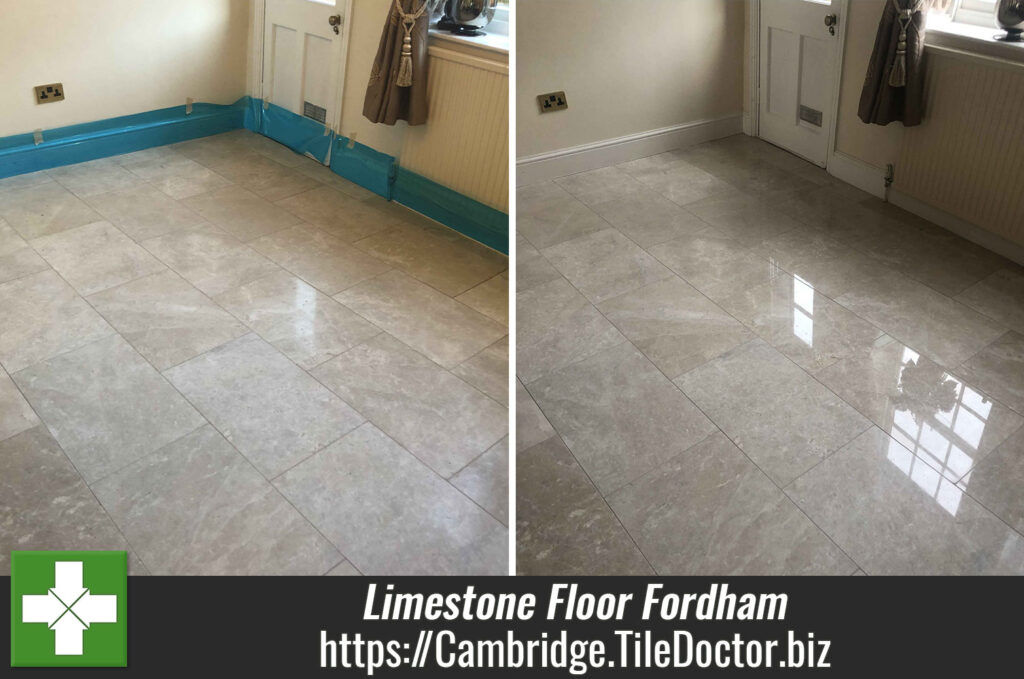
A client from Fordham on the outskirts of Cambridge called us in to renovate their polished Limestone flooring that ran throughout the ground floor. Years of general wear had made the stone lose it lustre and the client wanted it looking its best as they were looking to sell the property.

Large Limestone Floor Before Polishing Fordham WC Limestone Floor Before Polishing Fordham

Polished stone flooring does look incredible and gives any property a premium feel, however it does require regular maintenance if it’s to look its best. In fact, Tile Doctor offers a Maintenance Plan for floors like this one where we pop back once or twice a year to re-polish the stone with a high grit pad and top-up the sealer.

Without maintenance of this nature the polish will slowly wear down and eventually the sealer will fail allowing dirt to becoming ingrained in the stone and making it difficult to keep clean. The solution is to strip what’s left of the old sealer off the stone, bring up the polish using a set of diamond burnishing pads (Honing) and then re-seal and this is what I recommended for this Polished Limestone floor.

Kitchen Limestone Floor Before Polishing Fordham Large Limestone Floor Before Polishing Fordham

Cleaning and Honing a Polished Limestone Tiles

Before beginning the restoration, I took the usual precaution of covering the walls and kitchen units with thin blue plastic to protect them from exposure to any cleaning products or mess.

Working in the different areas one by one my first task was to give the Limestone a deep clean using a dilution of Tile Doctor Remove and Go, which is a coatings remover designed to break down any old sealant remaining on the tiles. This product is scrubbed in and then extracted, as well as removing the old sealer it also does a good job of cleaning the stone and grout. To extract the soils and clean the tiles afterwards I use a high-pressure hot water cleaning and extraction machine which is built into my van and keeps any mess to a minimum.

After completing the initial cleaning process, I moved on to honing the stone which slowly restores the polished appearance. This is done using a set of Diamond encrusted burnishing pads of different grits which slowly resurface the appearance of the Limestone tile removing scratches and other imperfections.

The process starts with the application of a coarse 400-grit pad, fitted to a rotary machine and is applied only with water to help lubricate the process. The resultant slurry is then rinsed away and the process repeated with a medium 800-grit pad again with water. At this point the polish on the stone starts to build and after another rinse and extraction is followed by a fine 1500-grit pad.

Finally, a very Fine 3000 grit pad is applied dry with only a little water sprayed onto the stone. The process of burnishing is a gradual but highly effective means of achieving this kind of finish.

Sealing Limestone Tiles

After burnishing the tiles and to achieve a really hard wearing and high polish I covered the floor in Tile Doctor Shine Powder crystals and buffed them into the Limestone tiles using a White buffing pad. Then to give the floor extra protection I applied a couple of coats of Tile Doctor Ultra-Seal, which soaks into the pores of the stone to prevent dirt from becoming ingrained there.

Large Limestone Floor After Polishing Fordham Kitchen Limestone Floor After Polishing Fordham

Ultra-Seal was chosen because it’s an invisible sealer which won’t affect the appearance of the Limestone resulting in a very natural appearance. You won’t realise its there until you spill something on the floor and then you will notice it pooling on the tiles to form a bubble that can be easily wiped off.

It took some time, but once completed the Limestone looked great with a really deep high shine that the light bounced off.

Large Limestone Floor After Polishing Fordham WC Limestone Floor After Polishing Fordham


Professional Polishing of a Dull Limestone Tiled Floor in Cambridgeshire

Honing Limestone Flooring Before House Sale in Fordham Village Read More »

Terracotta Effect Porcelain Tile Grout Before After Cleaning Ely

Terracotta Effect Porcelain Tile & Grout Deep Cleaned in Ely

We were called out to this property in Ely to carry out a deep clean on kitchen tiles that had the look of terracotta but were actually porcelain. The client had been cleaning the floor with household floor cleaner which really wasn’t working, and the grout had now turned black with ingrained dirt. If you have never been then Ely is well worth a visit, it’s a small but beautiful city on the West side of Cambridgeshire with a stunning ancient Cathedral which attracts visitors from outside the area.

Porcelain Tiled Kitchen Floor Before Cleaning Ely Porcelain Tiled Kitchen Floor Before Cleaning Ely

My client had dogs and with the kitchen tile and grout not having had a deep clean for several years it was now overdue a clean. We popped round to do a site visit to survey the floor and tested a small area with different products to see what would work best. The results looked good, and we agreed a price to carry the work and arranged a suitable time to complete the work.

Deep Cleaning Terracotta Effect Porcelain Tiles in Ely

We began by applying a strong dilution of Tile Doctor Pro-Clean to the floor and then worked it in with a stiff brush fitted to a rotary floor machine. The brush was run over the tiles and especially the grout lines where the recessed grout can be tricky to reach. Pro-Clean is a heavy duty alkaline cleaner that safe to use on Tile and Grout and works best when left to dwell for a short time so it can digest and breakdown the dirt.

This cleaning solution soon turned black with the dirt that was released from the tile and grout, so the next task was to extract it from the floor. For this we have a special extraction machine that applies hot water under high pressure to the floor and then extracts the soil back to a recovery tank on the van. This machine keeps the mess made to the absolute minimum whilst ensuring a thorough result.

The combination of the two processes had a remarkable effect on the tile and the grout which by now was looking much cleaner and lighter.

Grout Sealing a Porcelain Tiled Kitchen Floor in Ely

If these tiles were Terracotta then I the next step would be seal them once dry, however being made from nonporous Porcelain they won’t accept a sealer. The grout however has a porous cementitious top layer which attracts dirt so to keep the grout looking its best I set about speed drying it with air movers so it could be sealed.

Once dry I sealed the grout using a couple of coats of Tile Doctor Ultra Seal which is an impregnating sealer that will soak into the pores of the grout and protect it from within. Any excess was removed afterwards from the surface with a red buffing pad fitted to a buffing machine.

Porcelain Tiled Kitchen Floor After Cleaning Ely Porcelain Tiled Kitchen Floor After Cleaning Ely

As you can see from the pictures the floor looked much cleaner and fresher and with the grout now properly sealed it should no longer attract the dirt.

My Client gave us a 5 Star review with this feedback which we are always very grateful for.

“The tiles look great at present. It remains to be seen if the sealer that was applied really does make them repel stains. Tony P, Ely”


Professional Restoration of a Porcelain Tiled Kitchen Floor in Cambridgeshire

Terracotta Effect Porcelain Tile & Grout Deep Cleaned in Ely Read More »

Large Limestone Tiled Floor Before After Polishing Boxworth

Large Limestone Floor Polished to a Deep Lustre in Boxworth

I was asked to visit a house in Boxworth Cambridge to survey a large Limestone tiled kitchen, dining room, utility and hallway. The customer was not happy with the finish of the tiles and wanted it to have more lustre. Additionally, the floor had suffered some damage in the dining room where the floor had been scratched by table and chair legs.

Limestone Tiled Floor Before Cleaning Boxworth Cambridge Limestone Tiled Floor Before Cleaning Boxworth Cambridge

Boxworth is a small village of around 100 houses, this property being one of the larger ones. The village lies around eight miles to the north west of Cambridge. I examined the floor and discussed with the client the process we would use. Although not looking their best, I could see that the Limestone tiles contained a variety of natural colour shades which with the right treatment could be made to really come to life. I presented a quote which they were happy to accept.

Limestone Tiled Floor Before Cleaning Boxworth Cambridge Limestone Tiled Floor Before Cleaning Boxworth Cambridge

Cleaning a Limestone Tiled Kitchen and Hallway Floor

My first job was the protect all the surrounding areas from splashing during the cleaning process. To do this I removed the kickboards from underneath some of the kitchen units, elsewhere was covered with a blue protective film.

To start the cleaning, I first applied a dilution of Tile Doctor Remove and Go to the floor and then worked it in using a black scrubbing pad fitted to a rotary machine. I also scrubbed the grout by hand as the pads can struggle to reach into the recessed grout line. After rinsing the floor with water, the soiled solution was then extracted off the floor using a wet vacuum.

Limestone Tiled Floor During Polishing Boxworth Cambridge Limestone Tiled Floor During Polishing Boxworth Cambridge

I followed up this process with the application of a set of Diamond burnishing pads starting with the coarse 400-grit pad, then medium 800-grit pad, fine 1500-grit pad and finishing with the extra fine 3000-grit pad. The pads are fitted to a rotary floor buffer and are run over each tile using water for lubrication. All the slurry produced by the cleaning pads is removed away using our truck mounted hot water extraction machine to cause minimum mess to the client.

The floor was left to dry off overnight and I would return the next day to finish the polishing process.

Sealing a Limestone Tiled Kitchen and Hallway Floor

On the following day, we checked the floor was completely dry and then using a white buffing pad ground Tile Doctor Shine Powder into the Limestone floor. The powder builds up a deep and durable polish on the tiles leaving a deep and resilient lustre.

Limestone Tiled Floor After Polishing Boxworth Cambridge Limestone Tiled Floor After Polishing Boxworth Cambridge

To further protect the stone and enhance the natural colours in the Limestone a couple of coats of Tile Doctor Colour Grow impregnating sealer were applied followed by a light buff with a red pad. The sealant is an impregnator that seeps into the pores of the stone protecting it from within and intensifying the natural colours in the stone.

When finished the floor looked great. We had managed to remove the scratches from the dining area and the floor now had the lustre that the client had been hoping for.

The client was extremely happy with the outcome and gave the following feedback:

“Quoted very quickly, carried out the work quickly and efficiently with no fuss.”

Limestone Tiled Floor After Polishing Boxworth Cambridge Limestone Tiled Floor After Polishing Boxworth Cambridge


Professional Restoration of a Limestone Flooring in Cambridgeshire

Large Limestone Floor Polished to a Deep Lustre in Boxworth Read More »

Slate Floor Duxford After Cleaning and sealing

Dirty and Stained Slate Tiles Refreshed Near Duxford

This wonderful Slate tiled floor at a property near the old village of Duxford had been installed throughout the ground floor kitchen, utility room, dining room, and downstairs toilet, making it a very large area. As such, the property owner had struggled to keep the tile and grout looking it’s best and had tried many off the shelf supermarket-quality products without much success and you can see from the photographs the slate was now looking tired and the grout was quite stained and so we were called in to work our magic

Slate Floor Duxford Before Cleaning
While Slate is typically known for its durability, any kind of porous stone will over time become dirty and stained if the sealer is not maintained, sealers do fail eventually and usually in the highest traffic areas first where they become worn down the most.

Slate Floor Duxford Before Cleaning

Cleaning Dirty Slate Tile

Before starting the cleaning process, we protected the walls and skirting boards from coming into contact with products by covering them with plastic. I also opted to remove the kickboards from around the edges of the kitchen units, kickboards are usually just clipped into place and are easily put back later.

Slate Floor Duxford Before Cleaning Adding Protection
I then applied Tile Doctor Remove and Go to the floor, which is a multi-purpose stripper/cleaner designed to strip away old sealers and remove grout haze, adhesives and paints. It also draws out ingrained stains. The entire floor was blanketed in a thin plastic sheet to give the chemical time to emulsify the old sealers without drying out.

Slate Floor Duxford With Plastic Blanket
Next, I used our high-pressure extraction system to remove all the emulsified sealers. The system works by applying hot water under high pressure to the floor deep cleaning the tile, whilst simultaneously extracting the dirty water back to a tank on our van. This process did a great job of getting the floor clean and free of old sealers etc., and after completing the initial clean a thorough walk through of the floor was done to identify any stubborn areas that needed further treatment.

Slate Floor Duxford During Pressure Cleaning
Finally, the floor was left to dry overnight.

Sealing Slate Tiles

Upon arriving back at the property, the next day, I ran some quick damp tests to check that the floor was completely dry and ready to be sealed. Once satisfied, I applied several coats of Tile Doctor Seal and Go, which works really well on Slate giving it that much needed protection against dirt and stains, along with a full lustre finish that enhances the character of the floor, it was a large area and you have to wait for the first coat to dry before applying the next so it took some time to complete as I’m sure you can imagine.

Slate Floor Duxford After Cleaning and Sealing
You should be able to see the floor was quite transformed after our visit and needless to say the customer was very happy with the result.

Slate Floor Duxford After Cleaning and Sealing
 

Refurbishing a tired Slate Tiled Floor in Cambridgeshire

Dirty and Stained Slate Tiles Refreshed Near Duxford Read More »

Terracotta Tiled Floor After Clean and Seal in Great Gransden

Dull Terracotta Tiles Restored in Great Gransden

Due to its naturally high porosity, Terracotta is more susceptible to ingrained dirt than other types of stone tile. Typically, this downside is simple to offset with professional maintenance, including deep cleaning with suitable products and maintaining the sealer.

Terracotta Tiled Floor Before Clean and Seal in Great Gransden
Unfortunately, this Terracotta tiled floor at a property in Great Gransden (famous for being home to England’s oldest remaining windmill), had not been treated to professional maintenance for at least a decade. As you can imagine, the extremely outdated sealer had gradually broken down in most areas of the floor, leaving the tiles exposed to dirt and grime. I was asked by the property owner to restore the floor back to its original condition, and was more than happy to oblige!

Terracotta Tiled Floor Before Clean and Seal in Great Gransden

Cleaning a Dirty Terracotta Tiled Floor

The first step in the restoration was to strip the floor of the very old sealer by applying Tile Doctor Pro Clean, which both breaks down old sealers and removes light to medium soil buildup. After allowing the product twenty minutes to dwell, I went over the floor with a black scrubbing pad fitted to a rotary machine to ensure all of the old sealer was removed, mopping and rinsing the floor several times during the process.

Following this, I used a steamer in combination with Tile Doctor NanoTech HBU – a cleaner that uses nano-sized particles to penetrate and dissolve tough stains – to tidy up some of the more stubborn areas of muck. Finally, I gave the entire floor, including the grout lines, an acid rinse with Tile Doctor Grout Clean Up to remove inherent grout haze etc.

Sealing a Terracotta Tiled Floor

Once the cleaning process was complete, I left the floor to dry completely for 24 hours. This is the typical drying time for most natural stone floors, although the process will be sped up if there is a damp proof membrane or underfloor heating installed.

Terracotta Tiled Floor After Clean and Seal in Great Gransden
Upon my return to the property the next day I ran some damp tests to check for excess moisture, as this can cloud the sealer. Thankfully the floor was dry and I was able to start sealing the Terracotta starting with a single coat of Tile Doctor Colour Grow which is an impregnating sealer that seeps into the pores of the tile enhancing the natural colours and adding protection from within. One this was dry I continued the process by applying four further coats of Tile Doctor Seal and Go to achieve the desired sheen finish.

Terracotta Tiled Floor After Clean and Seal in Great Gransden
I made sure to give my very happy customer some advice on cleaning before departing the property as sealers do wear down over time so it’s important to maximise their longevity by using a pH neutral cleaning product for everyday cleaning.

Tile Cleaning and Sealing of a Dirty Terracotta Tiled a Floor in Cambridgeshire

Dull Terracotta Tiles Restored in Great Gransden Read More »

Travertine floor after polishing in Great Wilbraham Cambridge

Travertine Tiled Floor Stripped and Polished in Great Wilbraham

If you want a polished stone floor to keep its appearance, then it will need a regular maintenance plan in place, without it the stone will lose its polish and start to look dull and un-inviting which was the story with this Travertine tiled floor installed throughout much of the grout floor of this house in the village of Great Wilbraham near Cambridge.

Travertine floor before polishing in Great Wilbraham Cambridge
I was able to find out from the owner that the floor was last treated six years ago with Lithofin Stain Stop which is a solvent based impregnating sealer which like all sealers will wear off after a few years. Naturally this depends on the amount of wear the floor receives and what tends to happen is this process occurs more rapidly in the high traffic areas leading to an uneven appearance.

Travertine floor before polishing in Great Wilbraham Cambridge
The best course of action now would be to remove what was left of the sealer and re-polish and seal the floor.

Filling Holes in Travertine

During my inspection of the floor I had noticed a number of irregular holes in one of the Travertine tiles which needed filling with a colour matching filler; this worked out quite well and as you can see from the photographs below the result looked entirely natural.

Travertine floor before filling in Great Wilbraham Cambridge Travertine floor after filling in Great Wilbraham Cambridge

Stripping the Sealer from Travertine Floor Tiles

After protecting the clients skirting boards with protective film we proceeded to burnish the floor through with a set of Tile Doctor Diamond encrusted honing pads.

Travertine floor before polishing in Great Wilbraham Cambridge
During the application of the first coarse pad we also added a strong dilution of Tile Doctor Pro-Clean combined with NanoTech Ultra-Clean to aid the removal of sealer residues from the pores of the Travertine. The floor was then rinsed and the soiled solution extracted using a wet vacuum.

Travertine floor during polishing in Great Wilbraham Cambridge
With the sealer remove we were now able to concentrate on building up the polish on the stone by applying the remaining pads from Medium, Fine through to Very Fine, each lubricated with a little water and ensuring to rinse in-between the application of each pad.

Sealing Travertine Floor Tiles

With the floor now clean and the polish restored the last step was to protect it so it would keep its appearance for as long as possible. There are a number of solutions for this but for a long durable shine I opted to work Tile Doctor Shine Powder into the Travertine.

The powder is applied liberally to the floor and then ground in using a slow speed floor rotary machine fitted with a white or tan buffing pad lubricated with water.

Travertine floor during polishing in Great Wilbraham Cambridge
The shine on the floor has now been restored and the client has a
beautiful and durable finish to their Travertine tiles.

Travertine floor after polishing in Great Wilbraham Cambridge Travertine floor after polishing in Great Wilbraham Cambridge


Large Travertine Floor Cleaned, Polished and Sealed in Cambridgeshire

Travertine Tiled Floor Stripped and Polished in Great Wilbraham Read More »

Slates Tiles Hemingford Grey After Sealing

Large Slate tiled floor Cleaned and Sealed in Hemingford Grey

This is a 25m2 Slate tiled floor installed in a grade 2 listed coach house in the village of Hemingford Grey on the banks of the river Ouse. It was originally called the six bells and the original coach house sign is still hanging from its original ironwork in the entrance lobby. The slate floor was laid through the kitchen and hallway in 2000 and since then it had just been mopped and extra coats of polishes/waxes had been applied leading to a build-up.

Slates Tiles Hemingford Grey Before Cleaning

Cleaning the Slate Tiled Floor

Before starting work I protected the kitchen units and Aga cooker in plastic film to protect against splashing and mopped onto the tiles a dilution of Tile Doctor Remove and Go which is a coatings remover. Remove and Go I should mention is not only an effective cleaning product but as its name suggests is ideal for removing sealers from floors.

To get the floor completely clean you need to strip it back to bare tile and because of the layers of sealer we let the Remove and Go soak into the Slate tile for some time before being worked in using a rotary machine fitted with a black scrubbing pad. Then rather than wash the product away we blanketed the floor in a polythene sheet and left for two hours.

Slates Tiles Hemingford Grey During Cleaning
The polythene sheet prevents the floor from drying out and allows the chemical process of breaking down the layers of sealant to take place. After removing the sheet we scrubbed the floor again before removing the residue with our high powered internal pressure washing tool.

Slates Tiles Hemingford Grey After Cleaning
The floor was now bare and all the natural colours in the slate became far more evident. The tiles do need to be bone dry before sealing however so we left it to dry out for a day and left a number of special air blowers setup around the floor to assist with the drying.

Slates Tiles Hemingford Grey After Cleaning

Sealing the Slate Tiled Floor

When we returned the third day the floor was dry so we sealed it using five coats of Tile Doctor Seal and Go which is a water based sealer (so no smell) that add good stain protection as well as adding a nice subtle sheen to the tile which really enhanced the colours in the slate.

Slates Tiles Hemingford Grey After Sealing Slates Tiles Hemingford Grey After Sealing

The customer was ecstatic with the result, so much so that before we left she gave us a thank you card in an envelope. On returning to our unit we opened the card and out dropped £50, well I was amazed, even though we explain all the processes to our clients and take the upmost care at their homes we really didn`t expect that level of generosity. This is how the card read:

“To Mick,
Thank you to you and Tom for your high quality in Service, Integrity and Value x Excellent craftsmanship. Much appreciated. So pleased with your work.
Kind regards. M. Evans

It was a pleasure to work for such a nice lady and we look forward to returning in the New Year to restore some more stone and terracotta flooring for her.

Cleaning and Sealing a large Slate tiled floor in Cambridgeshire

Large Slate tiled floor Cleaned and Sealed in Hemingford Grey Read More »

Polishing Limestone Tiles in Cambridge After Cleaning

Limestone Tiled Floor Cleaned and Polished in Cambridge

These photographs are from a Limestone tiled floor installed at a residence in Cambridge. The tiles were in good condition but the shine on the Limestone had worn off leaving them looking dull and the owner wanted them re-polishing.

Polishing Limestone Tiles in Cambridge During Cleaning Polishing Limestone Tiles in Cambridge During Cleaning

Stripping and Polishing Limestone Floor Tiles

To restore the shine on polished stone we use a set of four diamond encrusted pads however before starting we gave the floor tiles a general clean with a dilution of Tile Doctor Pro-Clean mainly to clean-up the grout but also to remove any loose surface grit. The cleaning solution was rinsed away and removed with a wet vacuum before starting the burnishing process using a rotary scrubbing machine fitted with a coarse diamond encrusted burnishing pad and a little water. The coarse pad strips off dirt and old sealers from the tile and the resulting slurry is then removed using a wet vacuum.

The next pad after coarse is a medium grit which you apply in the same way followed by the fine pad again with a little water until the floor is polished. The final step to bring up the polish on the Limestone is to apply the last “Very Fine” pad which is fitted to the rotary machine and run over the floor tiles until they are buffed to a nice shine.

Sealing Limestone Floor Tiles

Once the floor was dry we set about sealing it using two coats of Tile Doctor Colour Grow Sealer which is a penetrating sealer that soaks into the pores of the stone filling them so dirt can’t penetrate below the surface. As well as offering excellent protection Colour Grow lifts the colours in the stone enhancing it’s natural beauty. Once sealing was complete and dry the Limestone tiles were given a final buff with a soft white pad.

Polishing Limestone Tiles in Cambridge After Cleaning Polishing Limestone Tiles in Cambridge After Cleaning


Large Format Limestone Tiles Cleaned, Polished and Sealed in Cambridge

Limestone Tiled Floor Cleaned and Polished in Cambridge Read More »

Quarry Tiled Pool Surround Cambridge During Sealing

Cleaning Quarry Tiles around an Indoor Residential Swimming Pool

Photographs below of a job we did cleaning and sealing the Quarry Tiles surrounding a residential indoor swimming pool floor tiles at a grand residence in Cambridge. As you can see from the photograph below the Quarry tiles and Grout was looking rather washed out and given their proximity to the pool extra care was needed to be ensure we didn’t contaminate the pool with dirty water from the cleaning process or chemicals, fortunately all our equipment is electrically isolated so that was not a problem.

Quarry Tiled Pool Surround Cambridge Before Cleaning Quarry Tiled Pool Surround Cambridge Before Cleaning

Swimming Pool Tile Cleaning

Fortunately the pool was fitted with a cover so we made a start cleaning the tiles using a strong dilution of Tile Doctor Pro-Clean mixed 50/50 with NanoTech Ultra Clean which add tiny abrasive particles into the cleaning solution making it more effective. Working in sections the solution was left to soak into the tile and grout before being worked into the floor using a rotary machine fitted with a scrubbing pad running at slow speed to reduce splashing. This process removed any remaining sealer and cleaned the tile and grout up nicely, we used clean water to rinse the floor and a wet vacuum to remove the soiled solution making sure not to drain any solutions into the pool and re-treating any stubborn areas. This process was fairly tedious and took up much of the day but the results were well worth the effort.

Quarry Tiled Pool Surround Cambridge After Cleaning Quarry Tiled Pool Surround Cambridge After Cleaning

Sealing Quarry Tiles around a Pool

The tiles were left to dry off overnight and we came back the next day to seal the floor using two coats of Tile Doctor Colour Grow which is an impregnating sealer that fills up the pores in a tile to protect it from stains whilst enhancing its natural colours.

Quarry Tiled Pool Surround Cambridge During Sealing
The process worked well and you can see the difference in the photographs above however the tricky nature of the environment meant it took longer than usual to complete but the main thing was the customer was happy with the result.

Quarry Tiled Pool Surround Cambridge After Sealing Quarry Tiled Pool Surround Cambridge After Sealing


Quarry Tiled Pool Surround Cleaned and Sealed in Cambridge

Cleaning Quarry Tiles around an Indoor Residential Swimming Pool Read More »

Porcelain Tile Cleaning Gamlingay After

Cleaning micro porous Porcelain tiles in Gamlingay

Most Porcelain tiles are non-porous making them an ideal floor covering especially in high traffic areas, the porcelain tiles fitted at this house in Gamlingay however featured small pits in the surface and over the years the pits had become engrained with dirt which proved difficult to clean. The porcelain tiles had been fitted throughout the ground floor and this was a reasonable sized house so it was going to take some time to clean.

Porcelain Tile Cleaning Gamlingay Before Porcelain Tile Cleaning Gamlingay Before

Cleaning Micro Porous Porcelain Tiles

To speed the job up we use a lot of machinery which can cause splashing so the first job was to protect all the walls with plastic sheeting and in the kitchen we removed the kick boards.

Working in sections the floor was wetted with a dilution of Tile Doctor Pro-Clean which was left to soak into the tile for twenty minutes to help break down the dirt before it was agitated and worked into the tile using a rotary machine fitted with a scrubbing pad.

Porcelain Tile Cleaning Gamlingay During Porcelain Tile Cleaning Gamlingay During

The combination of Pro-Clean and scrubbing action loosened the ingrained dirt leaving a dirty cleaning solution; scrubbing pads can struggle to reach the grout so this was scrubbed by hand using a stiff brush. Stubborn areas were re-treated and once we were happy with that section of floor it was pressure cleaned using a special spinner tool which applies clean under pressure as well as simultaneously extracting liquids from the surface. This tool has the added advantage of neutralising the floor ensuring no trace of chemical is left behind that could upset a sealer. Cleaning took much of the day so by the time we finished it was getting quite late so we left allowing the floor to dry off overnight.

Sealing Micro Porous Porcelain Tiles

We came back the next day to seal the floor and after checking the tiles had indeed dried we proceeded to apply Tile Doctor Ultra Seal which is an impregnating sealer designed to fill up the pores in the tile so contaminates cannot get it in, the other advantage of this particular sealer is it does not change the look of the tile.

Porcelain Tile Cleaning Gamlingay After Porcelain Tile Cleaning Gamlingay After


Porcelain Tile Cleaning in South Cambridge

Cleaning micro porous Porcelain tiles in Gamlingay Read More »

Harston Slate Tiled Floor After Cleaning

Slate Tiled Kitchen Floor Cleaned and Sealed in Harston

These photographs are from that lovely old period property in the village of Harston near Cambridge, you may recall an earlier post where I worked on the Victorian Tiled hallway. These photographs are from the Slate Tiled Kitchen floor which they asked me to clean and re-seal as well.

Harston Slate Tiled Floor Before Cleaning 1 Harston Slate Tiled Floor Before Cleaning Closeup Kitchen 2

Cleaning the Slate Tiled Floor

The process for cleaning and sealing slate is very similar to Victorian and Quarry tiles so this was as they say a bread and butter job for a Tile Doctor. The beauty of working in a kitchen is I was able to remove the kick boards instead of having to protect the skirting boards with tape. Once the preparation was done a dilution of Tile Doctor Pro-Clean was applied and left to soak into the Slate tile for a while before being worked in using a rotary machine fitted with a black scrubbing pad. Pro-Clean by the way is an alkaline cleaner so it’s safe to use on tile and stone unlike some acidic products which will cause damage over time.

Harston Slate Tiled Floor Cleaning 1 Harston Slate Tiled Floor Cleaning 2

As before I re-applied Pro-Clean on any stubborn stains and also gave the grout lines a good scrub with a stiff hand brush to make sure they were clean. Once happy with the general condition of the tile it was time to use the spinner tool which applies hot water under pressure effectively rinsing the floor whilst removing the water at the same time with suction. This does a great job of rinsing the floor and removing any trace of cleaning product before sealing, this is important to ensure a good finish when sealing.

Harston Slate Tiled Floor Rinse 1 Harston Slate Tiled Floor Rinse 2

Sealing the Slate Tiled Floor

The spinner tool does a good job of removing liquids from floors however the tile was still damp so it was left to dry assisted with air blowers until dry. Now normally I would use Tile Doctor Seal and Go to seal slate tile however the customer wanted a matt finish for this surface so it was sealed using two coats of Tile Doctor Ultra Seal which provides a more natural look it’s also recommended for use in food preparation areas.

Harston Slate Tiled Floor After Cleaning 1 Harston Slate Tiled Floor After Cleaning Closeup Kitchen 2


Cleaning and Sealing a Slate tiled kitchen floor in Harston, Cambridgeshire

Slate Tiled Kitchen Floor Cleaned and Sealed in Harston Read More »

Victorian Tiled Floor Harston After Cleaning and Sealing

Victorian Tiled Hallway Floor Cleaned and Sealed in Harston

These photographs are from a lovely old period property in the village of Harston near Cambridge which had an original Victorian Tiled floor installed throughout the hallway and stairwell. Considering its age the tiles were in a very good condition but they were looking dull and overdue for a deep clean and re-seal.

Victorian Tiled Floor Harston Hallway View Before Cleaning 1 Victorian Tiled Floor Harston Before Cleaning 2

Cleaning the Victorian Tiled Floor

Working in sections the first step was to protect the beautiful skirting boards with clear plastic fixed with decorator’s masking tape. This was followed by applying a dilution of Tile Doctor Pro-Clean and letting it soak into the tile for about 20 minutes before being agitated using a rotary machine fitted with a black scrubbing pad.

Victorian Tiled Floor Harston Skirting Protection 3 Victorian Tiled Floor Scrubbing Harston 4

This did a good job of cleaning the floor however there were some stubborn stains that needed further attention so more Pro-Clean was applied and worked in with a stiff hand brush as a steamer was used to help lift the dirt out of the pores in the tile. Once we were happy with the floor the soiled cleaning fluid was removed from the floor using a spinner tool which applies hot water under pressure effectively rinsing the floor whilst removing the water at the same time with suction.

Victorian Tiled Floor Harston Steam Cleaning 5 Victorian Tiled Floor Spinning and Steaming Harston 6

Sealing the Victorian Tiled Floor

The floor was left to dry assisted with air blowers before moving on to sealing with Tile Doctor Seal and Go which is a recommended sealer for Victorian floor tiles that provides on-going stain protection as well as adding a nice subtle shine to the floor.

Victorian Tiled Floor Harston After Cleaning and Sealing 7 Victorian Tiled Floor Harston Completed 8

The customer was really pleased with the results and even asked us back to do the slate tiles in the kitchen something I will no doubt write about in a later post.

Victorian Floor Cleaned and Sealed in Harston, Cambridgeshire

Victorian Tiled Hallway Floor Cleaned and Sealed in Harston Read More »

Sandstone Patio Completed Cambridge

Sandstone Tiled Patio Cleaned in Cambridge

Just so you know we don’t just clean stone and tile floors we also do external patios as well and this particular job was at a property in Cambridge with a Sandstone patio. We have all the tools and products to clean most surfaces so cleaning patios and brick paved driveways isn’t a problem.

Sandstone Patio Before Cambridge 1 Sandstone Patio Before Cambridge 2

The process was quite straight forward and involved pre-soaking the driveway with Tile Doctor Pro-Clean, it’s a versatile cleaner that equally effective on Patios as well as Tile, Grout and Stone; being an alkaline cleaner it has the added advantage that it doesn’t cause damage to the surface that typical acid cleaners can.

Sandstone Patio During Cleaning Cambridge 1 Sandstone Patio During Cleaning Cambridge 2

The Pro-Clean was left to dwell on the patio for a good hour before scrubbing it in with a stiff brush and following up with a high pressure professional jet washing machine which did a great job dislodging the grime that had built up on the surface over time. You can see from the photographs what a difference it made.

Sandstone Patio Kiln Sanding Cambridge
Pressure washing can dislodge the grout joints so once we were done cleaning the floor the gaps between the tiles was filled in kiln dried sand.

Sandstone Patio Completed Cambridge 1 Sandstone Patio Completed Cambridge 2

I think you will agree the patio looks good as new.

Sandstone Tile Restoration in Cambridge

Sandstone Tiled Patio Cleaned in Cambridge Read More »

Quarry Tiled Floor Cambridge After

Quarry Tiled Kitchen Floor Cleaned and Sealed in Cambridge

These photographs are from a Quarry Tile Cleaning job we did for a house owner in Cambridge, I’m afraid my photographs are not the best but I think you can see how the Quarry tiles were looking discoloured and worn.

Quarry Tiled Floor Cambridge Before

Cleaning Kitchen Quarry Tiles

Working in sections the floor was wetted with a dilution of Tile Doctor Pro-Clean combined 50/50 with Nanotech UltraClean, these two products combine to make a powerful and effective cleaning solution that’s safe to use on tile and stone. The solution was left to soak into the tile for twenty minutes whilst we got our machinery ready.

It helps if you have the right tools for the job and in this case we fitted a scrubbing pad to a rotary buffing machine and working the cleaning solution into the floor to scrub away the ingrained dirt. The machine can struggle to get into the grout lines so these need to be scrubbed by hand using a stiff brush and more cleaning solution. Once the floor was clean the soiled solution was picked up using a wet and dry vacuum and then washed down with clean water to remove any trace of chemical. This revealed a few stubborn areas that needed further work so these were re-treated and the floor washed down again and then left to dry overnight.

Sealing Kitchen Quarry Tiles

We came back the next day to seal the floor and after checking the tiles had indeed dried we proceeded to apply Tile Doctor Seal and Go which is a water based sealer (no smell) that really brings out the shine and colour in Quarry tiles. Around five coats were sufficient and once it had dried the floor was transformed.

Quarry Tiled Floor Cambridge After
 

Quarry Tile Renovation in Cambridge

Quarry Tiled Kitchen Floor Cleaned and Sealed in Cambridge Read More »

Scroll to Top