Remove and Go

Slate Floor Cleaning and Sealing Burwell

Restorative Cleaning and Sealing of a Slate Flooring in Burwell

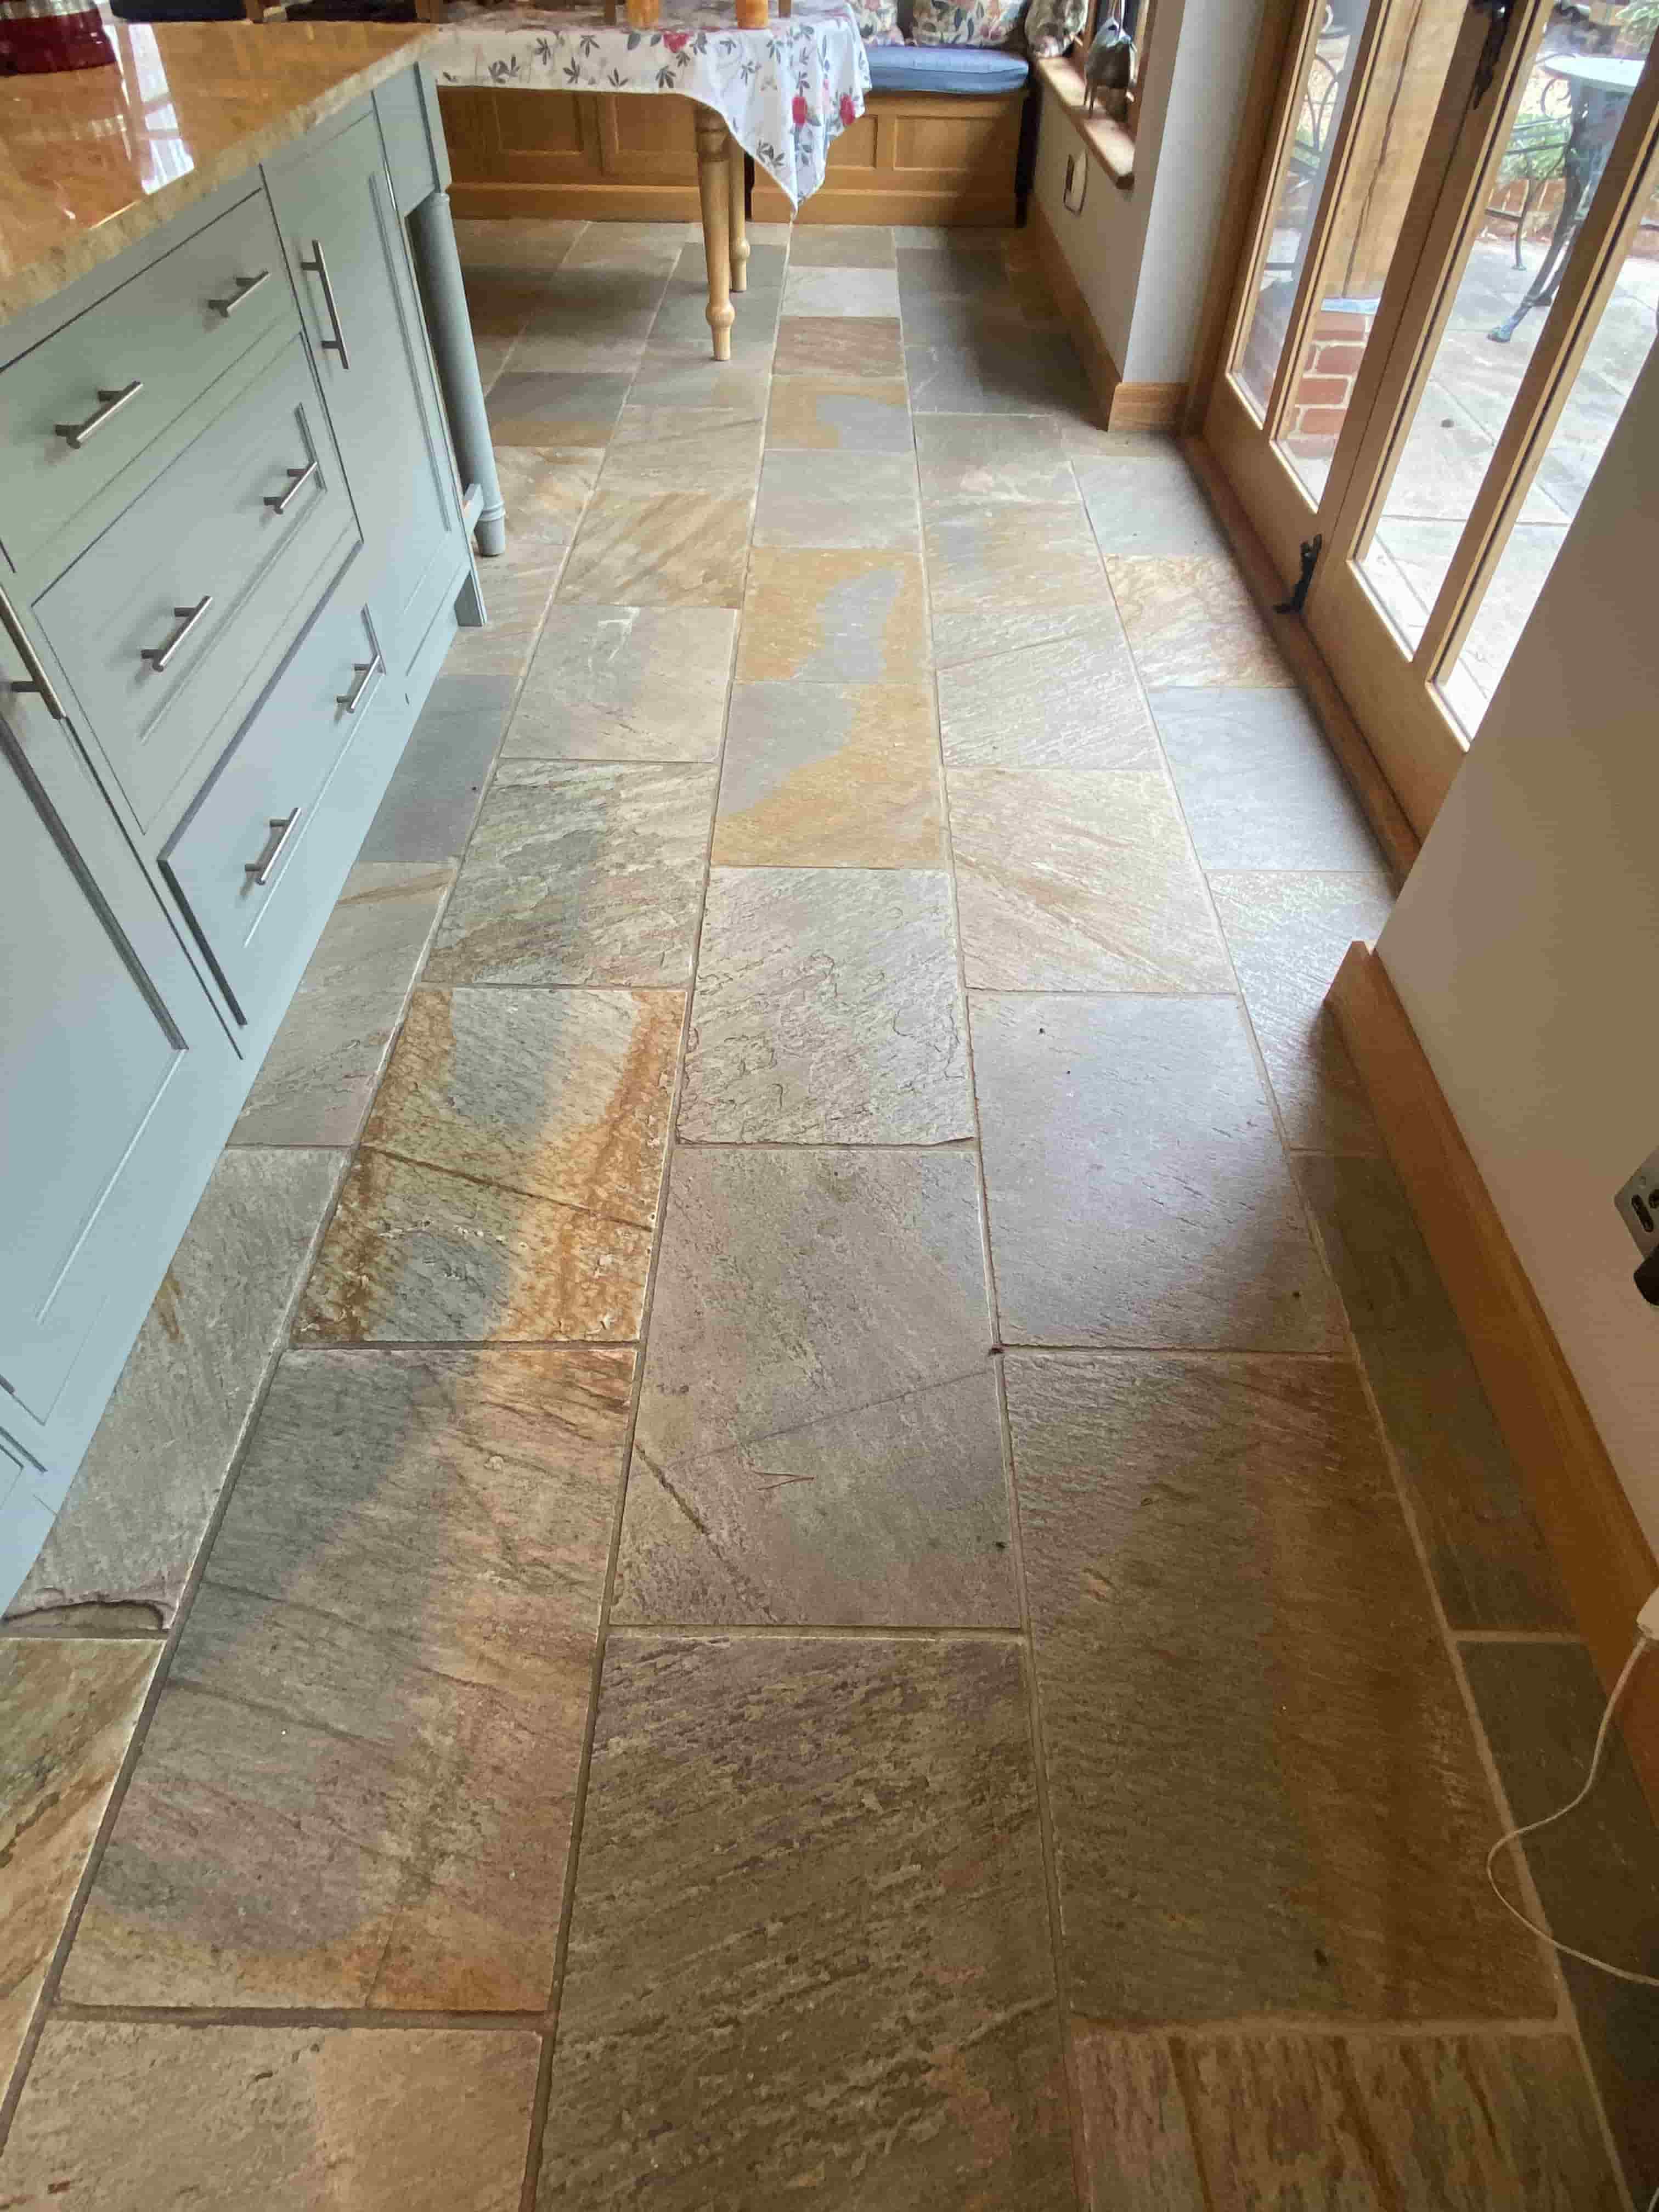
A client from the village of Burwell near Cambridge had recently moved into a property with a Slate tiled floor and was unhappy with its condition as it never looked clean. After discussing the problem over the phone, it was clear to me that the sealed has worn off and dirt was now lodged deeply in the pores of the stone making it difficult to clean.

Slate Floor Before Cleaning Burwell

The tiles were installed throughout much of the ground floor so there were several areas including the kitchen and living room that needed attention. Apart from the ingrained dirt the Slate floor was in good shape and just needed a deep clean and fresh sealer applied to renovate it.

Slate Floor Before Cleaning Burwell

I created a quote for a restorative clean and seal which was accepted, and a date agreed for the work to begin which should take two days, one to clean and then one to seal.

Deep Cleaning the Slate Tiled Floor

The first step to restore the stone was to remove what was left of the existing sealer. This is necessary to achieve a consistent finish as the wear on a sealer is always uneven due as the busiest areas wearing down first. To do this I sprayed each area of flooring with a dilution of Tile Doctor Remove and Go which is a coatings remover that is ideal for removing sealers, it’s also a powerful cleaning agent.

The Remove and Go was left to soak into the Slate tile for ten minutes before being worked in with a rotary machine fitted with a black scrubbing pad. The grout lines were also scrubbed at this point, this needs to be done manually with a stiff grout brush as the pads struggle to reach into the recesses of the grout lines. The resultant slurry was then rinsed away and extracted with a wet vacuum.

Last step before finishing for the day was to give the floor an acid wash using Tile Doctor Grout Clean-up. This cleans up the tiles by removing old grout smears that happen during installation and further cleans the stone.

After a final rinse and extraction with the wet vacuum the floor was left overnight to dry off.

Sealing Slate Floor Tiles

The next day I returned to apply a protective sealer checking first that the stone was dry using a moisture meter. We don’t recommend applying a sealer to a damp floor as this can lead to a patchy result.

Once satisfied the Slate was dry, multiple coats of Tile Doctor Seal and Go were applied. This is a water-based sealer (so no smell) that adds good stain protection and adds a nice subtle sheen to the tile which really enhanced the colours in the slate.

Slate Floor After Cleaning Sealing Burwell

The Slate floor was completely transformed by the work and my client was so impressed with the result they asked me to return and work my magic on their Travertine tiled bathroom.

Slate Floor After Cleaning Sealing Burwell

For aftercare cleaning of sealed Slate floors, I recommend the use of Tile Doctor Neutral Tile Cleaner which is a mild but effective tile cleaner. You need to be careful when choosing a cleaning product for sealed floors as many products are simply to strong and will erode the sealer prematurely.


Professional Renovation of a Slate Tiled floor in Cambridgeshire

Restorative Cleaning and Sealing of a Slate Flooring in Burwell Read More »

Limestone Floor Renovation Lode Cambridge

Heavily Soiled Limestone Floor Renovated in Lode Cambridge

I was contacted by a homeowner from the village of Lode near Cambridge about their beautiful Limestone floor that ran through most of the ground floor but mostly evident in the Kitchen.

The floor had not been deep cleaned and sealed for some years, and now with the sealer failing dirt was becoming lodged in the pores of the stone making it difficult to keep clean. What was once an attractive Limestone floor was now looking very grubby and un-appealing. The owner unhappy with its appearance asked if I could pop over and provide a price for renovating the floor.

Limestone Floor Before Cleaning Lode Cambridge

I went over to survey the tiles and provide a quote as requested. It was immediately clear to me that as suspected the sealer had definitely worn off and dirt was now building up in the pores of the stone where it’s difficult to shift. Whilst there I conducted a test clean of the floor so they could see the difference we could achieve and it was quite a contrast.

Limestone Floor Before Cleaning Lode Cambridge Limestone Floor Before Cleaning Lode Cambridge

Happy with the potential transformation I was booked to do the work and replace some grout that was missing in places.

Cleaning and Burnishing Limestone Tiles

Before beginning the restoration, I took the necessary precaution of covering the walls and kitchen units to protect them from exposure to cleaning products or mess.

Once that was done, I started the cleaning by applying Tile Doctor Remove and Go, which is a high-performance stripping and cleaning agent, to break down what was left of the sealer. This product can also be used to clean the stone itself, as well as the grout lines. I applied a strong dilution to the Limestone and grout lines and then let it soak in for ten minutes before scrubbing it in with a black pad fitted to a rotary buffer machine. Once done the soiling was rinsed away with water and removed with our high-pressure van mounted extraction system.

After completing the initial cleaning process, I moved on to restoring the polish to the tiles which we do with a set of diamond encrusted Burnishing Pads. Each pad has a different level of grit to grind away the dirt from the stone and build up the polished appearance. The process effectively resurfaces the stone leaving it looking new and fresh.

The process starts with the application of a coarse 400-grit pad, fitted to a rotary machine, to grind away any excess muck and sealant lubricated with a little water. The resultant slurry is rinsed away and I followed up with the application of the Medium 800 grit pad to start the restoration of the polish again with a small amount of water, followed by the Fine 1500 grit pad for the second polish.

Before finishing for the day, I regrouted those areas that needed attention and then left the floor to dry off overnight.

Sealing Limestone Tiles

The next day I started with the application of the last burnishing pad which is a very fine 3000-grit pad to achieve the most refined and highest quality polish possible. The process of burnishing is a gradual but highly effective means of achieving this kind of finish. This last pad is applied dry with only a little water sprayed onto the surface and leaves the floor dry.

The last step was to seal the floor and after discussing this with the owner previously it was clear they wanted the Limestone to keep its light appearance and so to seal the floor we used Tile Doctor Ultra Seal. This is a premium impregnating sealer that works by occupying the pores in the tile thereby preventing dirt from becoming lodged there.

Limestone Floor After Renovation Lode Cambridge Limestone Floor After Renovation Lode Cambridge

I completed the job just in time for Christmas 2022 and as you can see from the photos the Limestone was transformed. Needless to say, the client was extremely happy with the result and pleased the floor would be in good shape in time for the festivities.

For the regular cleaning of polished stone like this floor I recommend the use of Tile Doctor Stone Soap which is a gentle yet effective tile cleaner that helps maintain the patina.

Limestone Floor After Renovation Lode Cambridge


Professional Polishing of a Dull Limestone Tiled Floor in Cambridgeshire

Heavily Soiled Limestone Floor Renovated in Lode Cambridge Read More »

Slate Tiled Floor Cubicle Renovation West Wickham

Multi Coloured Slate floor in desperate need of a deep clean West Wickham

Having previously completed the restoration of a stone floor for this client in the village of West Wickham near Cambridge I was asked to return to look at the Multi-Coloured Slate tiles in the Kitchen of a rental property. The Slate floor had been laid throughout the Kitchen/Diner through to the Hallway and Utility room.

Multi-coloured Slate Tiled Floor Before Cleaning West Wickham

Over the years the sealer had worn down and dirt had become engrained in the pores of the Slate and had discoloured the grout. They were now in need of a deep clean and the tenant was pleased to be having the work done. It is always a delight to have an existing client have you back as there is no better testament of how happy they have been your work.

Multi-coloured Slate Tiled Floor Before Cleaning West Wickham

I visited the property to measure the area and carried out a few patch tests to check the best process and from that I was able to provide an accurate quote for the work. Happy with the quote I got the go ahead and a mutually convenient time to do the work was agreed with the tenant. It was a large area so the work would be a little disruptive.

Deep Cleaning a Multi Coloured Slate Tiled Floor

To start I applied a strong dilution of Tile Doctor Remove and Go, left it to soak in for ten minutes and then scrubbed the floor with a black scrubbing pad fitted to rotary machine. This action brought a lot of the ingrained dirt to the surface where I was able to remove it using our van mounted cleaning system that applies pressurised water to the floor whilst simultaneously extracting the soiled water to a tank in the van via a vacuum. This keeps the mess to a real minimum and improves drying times.

The tiles and especially the grout was very dirty and it was necessary to repeat this process a few times, hand scrubbing where necessary until I was satisfied the Slate and Grout was as clean as possible. It was a large area so I had to work in sections until all the floors were complete and once done it was left to dry off overnight.

Sealing a Multi Coloured Slate Tiled Floor

Returning the following morning work started by taking several moisture readings from each area with a damp meter to ensure the tiles were dry and ready for sealing. The readings were fine so the first of several coats of Tile Doctor Ultra Seal was applied. This sealer is almost invisible and so doesn’t affect the look of the stone leaving it with a completely natural finish.

Multi-coloured Slate Tiled Floor After Cleaning West Wickham

The client and tenant were very happy with the end result and have ordered some Tile Doctor Neutral Cleaner for the regular cleaning of the stone. Using our cleaner which is pH neutral will ensure the newly applied sealer is not compromised and will keep the floor in tip top condition particularly in the heavy traffic areas.

Multi-coloured Slate Tiled Floor After Cleaning West Wickham


Professional Clean and Seal of a Multi-Coloured Slate Floor in Cambridgeshire

Multi Coloured Slate floor in desperate need of a deep clean West Wickham Read More »

Quarry Tiled Kitchen Floor Before After Restoration Godmanchester

Removing Screed and Adhesive from Kitchen Quarry Tiles in Godmanchester

We received a call from a repeat client in the historic town of Godmanchester who needed help with a Quarry tiled Kitchen floor. The property had several period features that were to be kept as part of the restoration project. In fact, we had been out to the property before having restored the brick hallway floor, Victorian tiled dining room floor and fireplace quarry tiles. It’s always nice to return to previous clients and is testament to how satisfied they are with our previous work. The project was progressing and this time it was the kitchen floor that needed restoration.

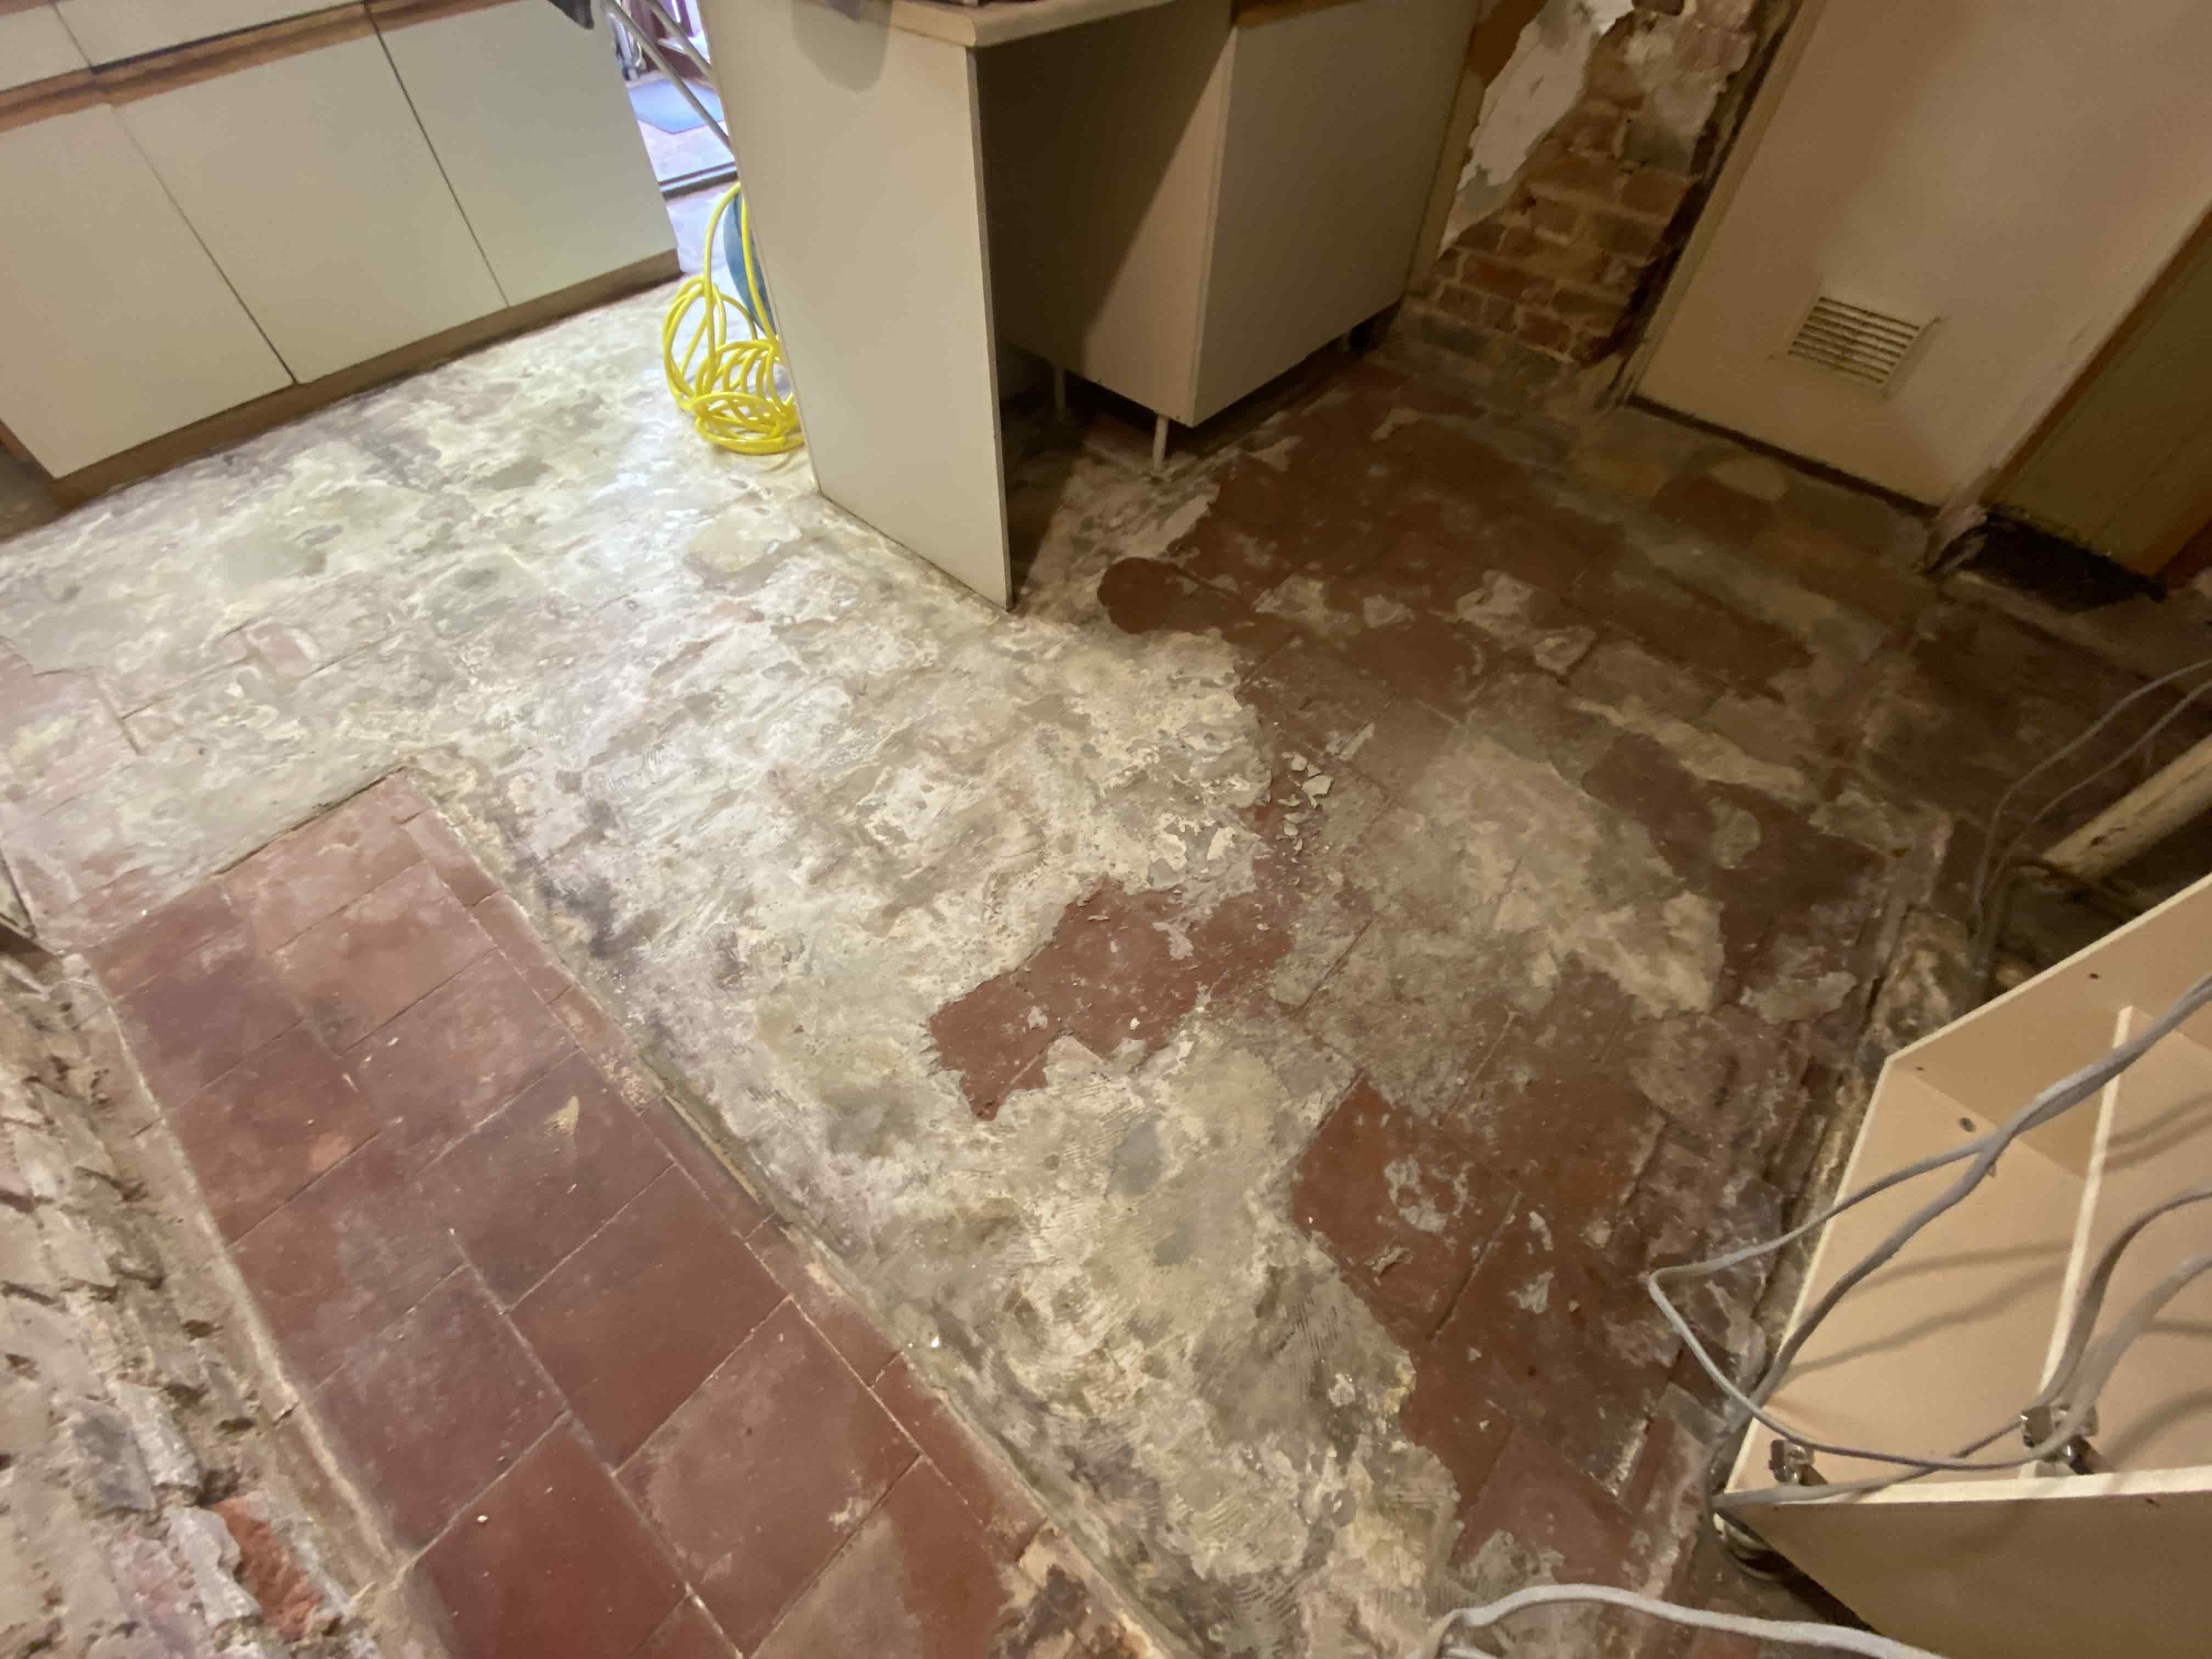
Quarry Tiled Kitchen Floor Before Screed Removal Godmanchester

The kitchen Quarry tiles were in quote a state, with adhesive and screed poured over the surface from a previous occupant who had put down vinyl over the tiles. The current owner had managed to remove the vinyl but was unsure how to tackle the screed and adhesive, so we were asked to do the work. I ran some tests to work out the best way to approach the job and once I was satisfied, I was able to give them a price for the work. They were happy to go ahead so we arranged a mutually convenient time.

Cleaning Cement Screed and Glue off Kitchen Quarry Tiles

This was one of the hardest removals I can remember doing and, in the end, it took two and a half days of hard work to complete. I used an air powered needle gun and scrappers to remove the majority of screed and glue from the affected area but still had to resort to hammer and chisel in places.

Quarry Tiled Kitchen Floor Before Screed Removal Godmanchester

To further clean up the tiles I then scrubbed the tile and grout with a strong dilution of Tile Doctor Remove and Go and Tile Doctor Acid Gel which was worked in together and then rinsed with water. The resultant soiling was then extracted using a wet vacuum. This process was repeated until I was satisfied the floor was as clean as it could be.

Sealing a Quarry Tiled Kitchen Floor

With no one living at the property the heating was not turned on and so I left the floor for a week to give it time to dry out. Also, on my return I tested the tiles with a damp meter to be 100% sure it was ready to take a sealer.

Given the age of the property we selected to seal the floor using Tile Doctor X-Tra Seal. The client didn’t want a high sheen finish, so this was the perfect solution. It’s a breathable impregnating sealer which is hardwearing and ideal for busy areas such as the kitchen. The first coat revived the colour and the second coat, added a nice subtle sheen finish.

Quarry Tiled Kitchen Floor After Screed Removal Godmanchester

My client was very pleased with the floor transformation and I was able to complete the restoration in time for the installation of new kitchen units the following month.

For aftercare cleaning I recommended the use of Tile Doctor Neutral Tile Cleaner, which is a gentle but effective pH neutral tile and grout cleaning product. This will keep the floor looking in great condition and ensure the newly applied seal retains its integrity.

Quarry Tiled Kitchen Floor After Restoration Godmanchester


Professional Restoration of a Quarry Tiled Kitchen in Cambridgeshire

Removing Screed and Adhesive from Kitchen Quarry Tiles in Godmanchester Read More »

Limestone Floor Polished in Fordham Cambridge

Honing Limestone Flooring Before House Sale in Fordham Village

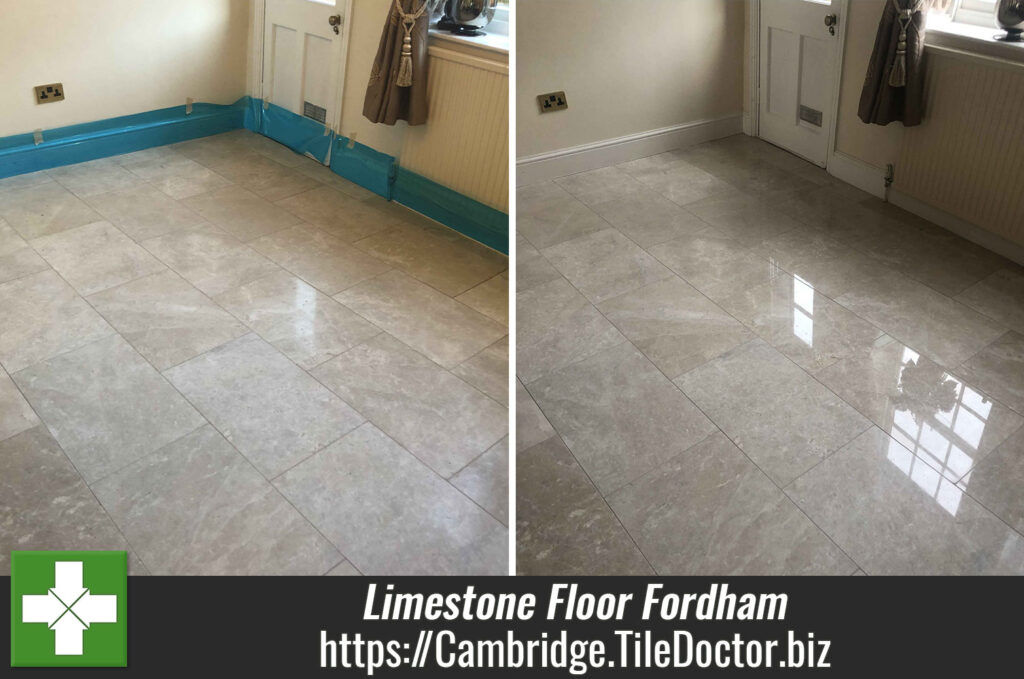
A client from Fordham on the outskirts of Cambridge called us in to renovate their polished Limestone flooring that ran throughout the ground floor. Years of general wear had made the stone lose it lustre and the client wanted it looking its best as they were looking to sell the property.

Large Limestone Floor Before Polishing Fordham WC Limestone Floor Before Polishing Fordham

Polished stone flooring does look incredible and gives any property a premium feel, however it does require regular maintenance if it’s to look its best. In fact, Tile Doctor offers a Maintenance Plan for floors like this one where we pop back once or twice a year to re-polish the stone with a high grit pad and top-up the sealer.

Without maintenance of this nature the polish will slowly wear down and eventually the sealer will fail allowing dirt to becoming ingrained in the stone and making it difficult to keep clean. The solution is to strip what’s left of the old sealer off the stone, bring up the polish using a set of diamond burnishing pads (Honing) and then re-seal and this is what I recommended for this Polished Limestone floor.

Kitchen Limestone Floor Before Polishing Fordham Large Limestone Floor Before Polishing Fordham

Cleaning and Honing a Polished Limestone Tiles

Before beginning the restoration, I took the usual precaution of covering the walls and kitchen units with thin blue plastic to protect them from exposure to any cleaning products or mess.

Working in the different areas one by one my first task was to give the Limestone a deep clean using a dilution of Tile Doctor Remove and Go, which is a coatings remover designed to break down any old sealant remaining on the tiles. This product is scrubbed in and then extracted, as well as removing the old sealer it also does a good job of cleaning the stone and grout. To extract the soils and clean the tiles afterwards I use a high-pressure hot water cleaning and extraction machine which is built into my van and keeps any mess to a minimum.

After completing the initial cleaning process, I moved on to honing the stone which slowly restores the polished appearance. This is done using a set of Diamond encrusted burnishing pads of different grits which slowly resurface the appearance of the Limestone tile removing scratches and other imperfections.

The process starts with the application of a coarse 400-grit pad, fitted to a rotary machine and is applied only with water to help lubricate the process. The resultant slurry is then rinsed away and the process repeated with a medium 800-grit pad again with water. At this point the polish on the stone starts to build and after another rinse and extraction is followed by a fine 1500-grit pad.

Finally, a very Fine 3000 grit pad is applied dry with only a little water sprayed onto the stone. The process of burnishing is a gradual but highly effective means of achieving this kind of finish.

Sealing Limestone Tiles

After burnishing the tiles and to achieve a really hard wearing and high polish I covered the floor in Tile Doctor Shine Powder crystals and buffed them into the Limestone tiles using a White buffing pad. Then to give the floor extra protection I applied a couple of coats of Tile Doctor Ultra-Seal, which soaks into the pores of the stone to prevent dirt from becoming ingrained there.

Large Limestone Floor After Polishing Fordham Kitchen Limestone Floor After Polishing Fordham

Ultra-Seal was chosen because it’s an invisible sealer which won’t affect the appearance of the Limestone resulting in a very natural appearance. You won’t realise its there until you spill something on the floor and then you will notice it pooling on the tiles to form a bubble that can be easily wiped off.

It took some time, but once completed the Limestone looked great with a really deep high shine that the light bounced off.

Large Limestone Floor After Polishing Fordham WC Limestone Floor After Polishing Fordham


Professional Polishing of a Dull Limestone Tiled Floor in Cambridgeshire

Honing Limestone Flooring Before House Sale in Fordham Village Read More »

Scroll to Top