floor restoration

Victorian-Tiled-Hallway Floor Renovated in Girton

Victorian Tiled Hallway Floor Repaired and Restored in Girton

The owner of this Victorian tiled hallway floor at a house in the village of Girton was unhappy with its condition and asked if we could call round and quote for having it deep cleaned and resealed. Girton is just north of Cambridge and only about six miles from our base so it wasn’t long before I was able to call in and survey the floor.

Victorian Tiled Hallway Before Cleaning Girton

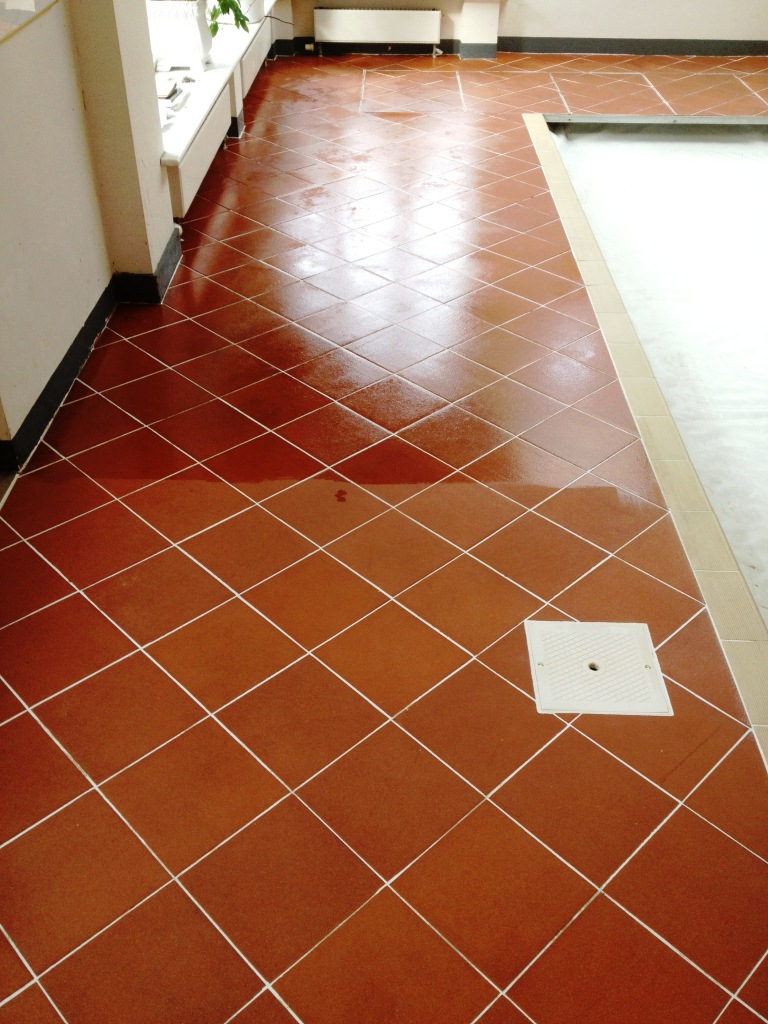
The floor was comprised of a combination of Red, Black and Cream tiles laid in a diamond pattern. The tiles were in good physical condition and I understand from the owner that it had been last cleaned and sealed about two years prior. Unfortunately, the sealer had now faded and had allowed dirt to become trapped in the pores of the tile giving it a grubby appearance that was difficult to clean effectively. The owner had two large dogs which I suspect contributed to the premature degradation of the sealer.

Victorian Tiled Hallway Before Cleaning Girton Victorian Tiled Hallway Before Cleaning Girton

I surveyed the floor, created a quote which was accepted and then agreed a date to return and renovate the floor.

Repairing a Victorian Tiled Hallway Floor

On my return I started by taping up the skirting boards and other woodwork with protective tape. Once that was done, I gave the tiles a soak in a medium dilution of Tile Doctor Remove and Go which was allowed to dwell for ten minutes before being scrubbed in using a black scrubbing pad fitted to a rotary floor buffer. Remove and Go is a coatings remover which cleans the tiles and removes any remaining sealer.

The soil generated was extracted off the floor using a wet vacuum and the tiles inspected. The tiles had responded well to the cleaning process and after spot treating a few areas with a repeat of the previous process it was ready for the next stage which was to give the floor an acid wash.

I had noticed there was a slight build-up of efflorescence along one of the walls which isn’t unusual on these old floors where no damp proof membrane has been installed under the floor. It’s caused by moisture rising through the tile and depositing white salt staining on the surface as it evaporates. To resolve this, we neutralise the salts by giving the floor a quick rinse in a dilution of Grout Clean-up.

The Grout Clean-Up rinsed off the floor with water and extracted with the wet vacuum which was employed to get the floor as dry as possible before leaving for the evening.

Sealing Victorian Hallway Tiles

The floor was left to dry off fully overnight and I returned the next day, unfortunately after checking the moisture levels I found it needed more drying time, so I agreed to come back the next day.

The moisture levels were fine on day three, so I applied multiple coats of Tile Doctor Seal and Go. Seal and Go is a water-based product so you don’t get left with a smell as it dries. As well as protecting the tiles the sealer also adds a nice subtle sheen that works well on Victorian Tiles and has put new life into the tiled hallway.

Victorian Tiled Hallway After Cleaning Girton Victorian Tiled Hallway After Cleaning Girton

Seal and Go is a breathable sealer so it will allow moisture to rise up through the tiles however had the efflorescence problem had been worse I would have used a different sealer. On this occasion however the problem appeared to be historical rather than recent.

My client was very happy with the transformation and left the following feedback.

“We are delighted with our Victorian tiled hall floor after treatment by Tom from Tile Doctor. A very professional service. Good communication throughout, and dedication to ensuring our full satisfaction; not a ways obvious when dealing with old tiles with different levels of porosity! Thank You!”

Victorian Tiled Hallway After Cleaning Girton


Repair Restoration of a Victorian Tiled Hallway in Cambridgeshire

Victorian Tiled Hallway Floor Repaired and Restored in Girton Read More »

Victorian Tiled Hallway Before After Restoration Great Paxton Cambridgeshire

Victorian Tiled Hallway Floor Repaired and Restored in Great Paxton

I was called out to a house in the Village of Great Paxton to quote for deep cleaning a sealing a Victorian tiled hallway floor, there was also a triangular cemented section at the bottom of the stairs that the owner wanted retiling to match.

Victorian Tiled Hallway Before Restoration Great Paxton Victorian Tiled Hallway Before Cleaning and Repair Great Paxton

Fortunately, the owner had discovered some spare tiles in the under-stair cupboard that would do the job; were not sure why this triangular section had been cemented in at some point in the past, but I was happy that the spare tiles would be enough to cover. My quote was accepted, and it wasn’t long before I was able to return to carry out the renovation.

Repairing a Victorian Tiled Hallway Floor

I started by taping up the skirting boars and other woodwork with protective tape. Once that was done I removed the triangular section of cement at the foot of the stairs. I noticed that the sub floor consisted of rubble and sand so once removed I was able to lay a section of a damp prof membrane and then back filled with self-levelling compound.

Victorian Tiled Hallway During Cleaning and Repair Great Paxton

Once the levelling compound had dried I laid the tiles that the owner had found under the stairs continuing the black and red diamond pattern. I used a quick setting adhesive which enabled me to grout the tiles in before leaving for the day and leave it to set overnight.

Deep Cleaning a Victorian Tiled Hallway Floor

Day two was begun by inspecting the previous day’s work to make sure all was well with the tiling and then continuing the restoration of the floor. In general, the tiles were dirty and had white paint splashed from decorating and so were now looking dull and faded. To remove the ingrained dirt, I gave the tiles a soak in a medium dilution of Tile Doctor Remove and Go which was scrubbed in using a black scrubbing pad fitted to a rotary floor buffer. This process did a good job of removing the dirt and softened the paint splashes which I was then able to carefully scrape off.

After rinsing the floor with water and extracting the soil with a wet vacuum I could see the tiles were much cleaner but needed more work to get the replacement section to blend better with the existing. To resolve this, I honed the surface of the tiles with a 100-grit and then 200-grit pad rinsing with water and extracting after each pad.

Sealing Victorian Hallway Tiles

The floor was left to dry off fully overnight and I returned the next day to apply a sealer that would add colour and protect the tiles going forward. Multiple coats of Tile Doctor Seal and Go were applied which a water-based product that adds a nice subtle sheen to the floor which works well on Victorian Tiles and put new life into the tiles.

Victorian Tiled Hallway After Restoration Great Paxton Victorian Tiled Hallway After Cleaning and Repair Great Paxton

My customer was very happy with the transformation and left the following feedback.

“We are very pleased with the restoration of our Victorian tiles in the hallway. We are also very pleased with the service and quality of the works carried out.”


Repair Restoration of a Victorian Tiled Hallway in Cambridgeshire

Victorian Tiled Hallway Floor Repaired and Restored in Great Paxton Read More »

Slates Tiles Hemingford Grey After Sealing

Large Slate tiled floor Cleaned and Sealed in Hemingford Grey

This is a 25m2 Slate tiled floor installed in a grade 2 listed coach house in the village of Hemingford Grey on the banks of the river Ouse. It was originally called the six bells and the original coach house sign is still hanging from its original ironwork in the entrance lobby. The slate floor was laid through the kitchen and hallway in 2000 and since then it had just been mopped and extra coats of polishes/waxes had been applied leading to a build-up.

Slates Tiles Hemingford Grey Before Cleaning

Cleaning the Slate Tiled Floor

Before starting work I protected the kitchen units and Aga cooker in plastic film to protect against splashing and mopped onto the tiles a dilution of Tile Doctor Remove and Go which is a coatings remover. Remove and Go I should mention is not only an effective cleaning product but as its name suggests is ideal for removing sealers from floors.

To get the floor completely clean you need to strip it back to bare tile and because of the layers of sealer we let the Remove and Go soak into the Slate tile for some time before being worked in using a rotary machine fitted with a black scrubbing pad. Then rather than wash the product away we blanketed the floor in a polythene sheet and left for two hours.

Slates Tiles Hemingford Grey During Cleaning
The polythene sheet prevents the floor from drying out and allows the chemical process of breaking down the layers of sealant to take place. After removing the sheet we scrubbed the floor again before removing the residue with our high powered internal pressure washing tool.

Slates Tiles Hemingford Grey After Cleaning
The floor was now bare and all the natural colours in the slate became far more evident. The tiles do need to be bone dry before sealing however so we left it to dry out for a day and left a number of special air blowers setup around the floor to assist with the drying.

Slates Tiles Hemingford Grey After Cleaning

Sealing the Slate Tiled Floor

When we returned the third day the floor was dry so we sealed it using five coats of Tile Doctor Seal and Go which is a water based sealer (so no smell) that add good stain protection as well as adding a nice subtle sheen to the tile which really enhanced the colours in the slate.

Slates Tiles Hemingford Grey After Sealing Slates Tiles Hemingford Grey After Sealing

The customer was ecstatic with the result, so much so that before we left she gave us a thank you card in an envelope. On returning to our unit we opened the card and out dropped £50, well I was amazed, even though we explain all the processes to our clients and take the upmost care at their homes we really didn`t expect that level of generosity. This is how the card read:

“To Mick,
Thank you to you and Tom for your high quality in Service, Integrity and Value x Excellent craftsmanship. Much appreciated. So pleased with your work.
Kind regards. M. Evans

It was a pleasure to work for such a nice lady and we look forward to returning in the New Year to restore some more stone and terracotta flooring for her.

Cleaning and Sealing a large Slate tiled floor in Cambridgeshire

Large Slate tiled floor Cleaned and Sealed in Hemingford Grey Read More »

Polishing Limestone Tiles in Cambridge After Cleaning

Limestone Tiled Floor Cleaned and Polished in Cambridge

These photographs are from a Limestone tiled floor installed at a residence in Cambridge. The tiles were in good condition but the shine on the Limestone had worn off leaving them looking dull and the owner wanted them re-polishing.

Polishing Limestone Tiles in Cambridge During Cleaning Polishing Limestone Tiles in Cambridge During Cleaning

Stripping and Polishing Limestone Floor Tiles

To restore the shine on polished stone we use a set of four diamond encrusted pads however before starting we gave the floor tiles a general clean with a dilution of Tile Doctor Pro-Clean mainly to clean-up the grout but also to remove any loose surface grit. The cleaning solution was rinsed away and removed with a wet vacuum before starting the burnishing process using a rotary scrubbing machine fitted with a coarse diamond encrusted burnishing pad and a little water. The coarse pad strips off dirt and old sealers from the tile and the resulting slurry is then removed using a wet vacuum.

The next pad after coarse is a medium grit which you apply in the same way followed by the fine pad again with a little water until the floor is polished. The final step to bring up the polish on the Limestone is to apply the last “Very Fine” pad which is fitted to the rotary machine and run over the floor tiles until they are buffed to a nice shine.

Sealing Limestone Floor Tiles

Once the floor was dry we set about sealing it using two coats of Tile Doctor Colour Grow Sealer which is a penetrating sealer that soaks into the pores of the stone filling them so dirt can’t penetrate below the surface. As well as offering excellent protection Colour Grow lifts the colours in the stone enhancing it’s natural beauty. Once sealing was complete and dry the Limestone tiles were given a final buff with a soft white pad.

Polishing Limestone Tiles in Cambridge After Cleaning Polishing Limestone Tiles in Cambridge After Cleaning


Large Format Limestone Tiles Cleaned, Polished and Sealed in Cambridge

Limestone Tiled Floor Cleaned and Polished in Cambridge Read More »

Quarry Tiled Pool Surround Cambridge During Sealing

Cleaning Quarry Tiles around an Indoor Residential Swimming Pool

Photographs below of a job we did cleaning and sealing the Quarry Tiles surrounding a residential indoor swimming pool floor tiles at a grand residence in Cambridge. As you can see from the photograph below the Quarry tiles and Grout was looking rather washed out and given their proximity to the pool extra care was needed to be ensure we didn’t contaminate the pool with dirty water from the cleaning process or chemicals, fortunately all our equipment is electrically isolated so that was not a problem.

Quarry Tiled Pool Surround Cambridge Before Cleaning Quarry Tiled Pool Surround Cambridge Before Cleaning

Swimming Pool Tile Cleaning

Fortunately the pool was fitted with a cover so we made a start cleaning the tiles using a strong dilution of Tile Doctor Pro-Clean mixed 50/50 with NanoTech Ultra Clean which add tiny abrasive particles into the cleaning solution making it more effective. Working in sections the solution was left to soak into the tile and grout before being worked into the floor using a rotary machine fitted with a scrubbing pad running at slow speed to reduce splashing. This process removed any remaining sealer and cleaned the tile and grout up nicely, we used clean water to rinse the floor and a wet vacuum to remove the soiled solution making sure not to drain any solutions into the pool and re-treating any stubborn areas. This process was fairly tedious and took up much of the day but the results were well worth the effort.

Quarry Tiled Pool Surround Cambridge After Cleaning Quarry Tiled Pool Surround Cambridge After Cleaning

Sealing Quarry Tiles around a Pool

The tiles were left to dry off overnight and we came back the next day to seal the floor using two coats of Tile Doctor Colour Grow which is an impregnating sealer that fills up the pores in a tile to protect it from stains whilst enhancing its natural colours.

Quarry Tiled Pool Surround Cambridge During Sealing
The process worked well and you can see the difference in the photographs above however the tricky nature of the environment meant it took longer than usual to complete but the main thing was the customer was happy with the result.

Quarry Tiled Pool Surround Cambridge After Sealing Quarry Tiled Pool Surround Cambridge After Sealing


Quarry Tiled Pool Surround Cleaned and Sealed in Cambridge

Cleaning Quarry Tiles around an Indoor Residential Swimming Pool Read More »

Porcelain Tile Cleaning Gamlingay After

Cleaning micro porous Porcelain tiles in Gamlingay

Most Porcelain tiles are non-porous making them an ideal floor covering especially in high traffic areas, the porcelain tiles fitted at this house in Gamlingay however featured small pits in the surface and over the years the pits had become engrained with dirt which proved difficult to clean. The porcelain tiles had been fitted throughout the ground floor and this was a reasonable sized house so it was going to take some time to clean.

Porcelain Tile Cleaning Gamlingay Before Porcelain Tile Cleaning Gamlingay Before

Cleaning Micro Porous Porcelain Tiles

To speed the job up we use a lot of machinery which can cause splashing so the first job was to protect all the walls with plastic sheeting and in the kitchen we removed the kick boards.

Working in sections the floor was wetted with a dilution of Tile Doctor Pro-Clean which was left to soak into the tile for twenty minutes to help break down the dirt before it was agitated and worked into the tile using a rotary machine fitted with a scrubbing pad.

Porcelain Tile Cleaning Gamlingay During Porcelain Tile Cleaning Gamlingay During

The combination of Pro-Clean and scrubbing action loosened the ingrained dirt leaving a dirty cleaning solution; scrubbing pads can struggle to reach the grout so this was scrubbed by hand using a stiff brush. Stubborn areas were re-treated and once we were happy with that section of floor it was pressure cleaned using a special spinner tool which applies clean under pressure as well as simultaneously extracting liquids from the surface. This tool has the added advantage of neutralising the floor ensuring no trace of chemical is left behind that could upset a sealer. Cleaning took much of the day so by the time we finished it was getting quite late so we left allowing the floor to dry off overnight.

Sealing Micro Porous Porcelain Tiles

We came back the next day to seal the floor and after checking the tiles had indeed dried we proceeded to apply Tile Doctor Ultra Seal which is an impregnating sealer designed to fill up the pores in the tile so contaminates cannot get it in, the other advantage of this particular sealer is it does not change the look of the tile.

Porcelain Tile Cleaning Gamlingay After Porcelain Tile Cleaning Gamlingay After


Porcelain Tile Cleaning in South Cambridge

Cleaning micro porous Porcelain tiles in Gamlingay Read More »

Scroll to Top